https://lizscreativecorner.blogspot.com/http://lizscreativecorner.blogspot.com.au/p/my-canvases-and-altered-art.htmlhttp://lizscreativecorner.blogspot.com.au/p/my-tutorials.htmlhttp://lizscreativecorner.blogspot.com.au/p/challenges_24.html

Pages

My Lovely Friends,

Friday 28 June 2019

For You

Hi all, I made this exploding box using some fabulous products Lady E Dies, Foamiran and
BlooMar Design chipboards,


I added some Lindy's Gang embossing powder to the flower section of the BlooMar For You chipboard sentiment and a little green embossing powder to the leaves too, I left the rest of the chipboard in it's lovely natural state,
The papers and Butterflies were from the Mintay Birdsong papers collection,


When the box is opened I have some more Chipboards, coloured the same way with some handmade poppies as the main centre piece, 


I created the Poppies using some 0range 0.6 Foamiran and the Flower 6 Poppy dies by Lady E Designs,using the largest  flower dies for the Poppies, the leaf dies are part of the set too, these I cut out of 0.6 Olive green Foamiran,

I also hand cut some stamens for them out of the same orange Foamiran,
I created the plant holder out of some twigs which I cut down and glued together to form a plant pot/trough then simply added some Oasis for dry flower arrangements with some natural coloured Sisal over the top, with some moss at the base,

I wrapped floral tape round the flower wires and leaf stems,


I though it would be perfect for a Garden Lover,


Swedish House Craft - 0.6 Foamiran 
Happy Crafting!!

Thursday 27 June 2019

Orange Poppies

Hi Guys, I thought I'd show you some Poppies I've made using 
Lady E Design Poppy Dies,

I've created something with them which will be on my blog tomorrow, but first I thought I'd show you them before I used them in my finished project,
I created them using Orange 0.6 Foamiran for the Poppy heads and the Leaves I cut out of 0.6 Olive green Foamiran,

I hand cut some stamens for them using the same Orange Foamiran,

I will show you tomorrow how I used them in my final project, see you soon,
Happy Crafting!!

Sunday 23 June 2019

Anniversary card

Hi guys, it was my Sister and Brother-in-laws wedding Anniversary earlier on this month and so I made this card for them,
All the products described below came from Swedish House Crafts


I used one of the fabulous new papers by Maja Design - Lace from the  Denim & Girls 12" x 12" using both sides of the sheet, I layered the front section onto a piece of Crafters Companion white card, stock then simply distressed the edges with vintage photo distress ink and my distress tool,


I wanted to use this adorable chipboard heart by Laserowe Love, taking a piece of washing up foam I dabbed some white Gesso onto the chipboard, this helps add a little texture too,
Inside the heart I added a sentiment made from one of the laserowe papers from the Be with me collection, again I coloured and distressed the edges,


I handmade some Foamiran flowers out of white 0.6 Foamiran and the Lady E Design Flower die 004, the leaves I cut out of the Lady E Design Tiny leaves dies using the same paper I used for the background on the card,


I love the size of roses you can make using the Flower 004 dies,


I then took another Lady E Design die Tiny Flowers to create these flowers, I used the same Foamiran simply colouring them with some soft pastel,


Happy Crafting!!

Saturday 15 June 2019

Treasures of the Sea

Hi guys, I've been in a mixed media mood again, and having seen the fabulous mood Board on the Lindy's Gang challenge I just had to make something,
I was one of the lucky winners on their last challenge and so I have used some of the products I won as well as some I ordered too,
I must say I thought the postage was expensive because imports to Britain always are but the service was super quick and really well wrapped and I also got a freebie on the order too, so i now think it's worth it
 AWESOME!!

I had a glass jar/bottle in my stash and so I altered it with a under the Sea theme, in the fabulous colours on the moodboard, 
I painted the jar/bottle first with some white Gesso on the lower half and clear Gesso on the top, I saw one of the Lindy's girls do this on a clear glass bowl and loved it so I just had to try it myself, thanks for the idea Anat,
When the Gesso had dried I added some crackle paste here and there, then when this dried I started adding some of the Magicals and  Flat Magicals by simply watering a little of the powders down with a little water, painting on randomly with a soft brush then spraying more water over the top with a spray bottle, I will list the colours below,
On the top I added a Dusty Attic chipboard which I had added a layer of white Gesso too, then painted over with the same colours,
The embellishment was metal and again I painted it with white Gesso then two colours of the Magicals, I added a gem which had a layer of paint over as well,

I then added some Moss, shells and a clock face made with air dry clay and a mould from my stash, around the jar/bottle,
I used this awesome Resin Mermaid from Sarah at the Embellishment shop and coloured her with Lindy's Gang embossing powders,
I then used a pearl brad which I cut the brads off the back first, then some pearl effect gem stones and a little bottle from my stash,
I lso added a layer of Gesso to the mould before gluing in place, then when dry I added some of the colours here too,
I added some white 13 Arts embellishment here and there to fill in some of the places, then coloured them with the Flat Magical - Mango Mania, I thought this made it look like Coral,
I carried on with the theme also adding this wooden ships wheel which I again created using the same method to create the look,
Here I used a metal Anchor embellishment,
I coloured some of the jar/bottle and left the other parts with just the Gesso,
Love the way it looks fab over the crackle paste,
In some places I let the glass show through too,
products used:

 Mango Mania
 Luscious Lime

 Shabby Tubine Teal
Rusty lantern Lime
Time Travel Teal

Morning Glory
Spring leaf
Sunrise Salmon Gold


Happy Crafting!!

Wednesday 12 June 2019

Rustic charm

Hi guys, It's horrible weather here at the moment, it's nothing but rain and it's cold with it too, it's so not summer!!!
Anyway I decided I'd cheer myself up with some gorgeous papers by Mintay design from the Dreamer collection, just love the colours in this collection,

I made some handmade foamiran flowers out of the latest Flowers 6 Poppy dies by Lady E Design and I used some of the leaves dies one of the latest border dies as well, these dies all cut like a dream,
I first glued a fussy cut flower group from the papers on one side then added a window...
I have a thing for windows usually in chipboard but loved this window from the cut out sheet from the paper collection, so just had to use it,

I made my flowers out of pale pink and Lilac 0.6 foamiran and used some centres from 14 Craft Bar,
I made the flowers by layering four or five layers using the latest Poppy Flower 6 die in two sizes, simply scrunching each flower head first, then slightly separate and glue the layers together alternating the petals as you go, add the centre button and when dry ruffle up the petals around the button,
I then glued these in place on top of some of the die cut leaves from the Lady E Design Herbs collection and the Lady E Design Swirls set,
These I trimmed down on some of the dies and added a little vintage photo on some of the edges,

I finished the card off with some sequins here and there too,


Happy Crafting!!

Saturday 8 June 2019

One for the guys

Hi guys, It was my Son-In-laws Birthday earlier this week and yep he still loves his video games, so when I saw this fabulous digital image from Zoe at Make It Crafty I couldn't resist colouring him up,
this is only the second image I've coloured up in months so hope it's ok,


I used some water colour card stock and distress re-inkers to colour up the image, then I used one of the fabulous new Border dies by Emelia from Lady E design on one edge, this cut through the thicker card perfectly, 
(ps: there are four new dies out in this latest release, why not check them out)
I made the background of the card myself with Lindy's Gang products again on water colour  card,
along with some of my handmade stencil paste and a stencil from my stash,

Happy Crafting!!

Friday 7 June 2019

Congrats by Liz

Hi Guys, I thought I'd show you an exploding box I've made for 
Swedish house Crafts using some of the fabulous products Suha has in her online store,


As per usual I've created something a little hard to photograph, lol

I got these awesome PND Hippo's  stamps in my DT kit and just had to colour them up, now I've not coloured anything for about 8 months so I hope I've done ok,

I made my box up with white card as the base then added some paper out of the Maja Design Denim and Girls collection 6 x 6 inch paper pack,
I then cut a smaller layer out of a sheet of Maja design Shades of Monochromes,
then I cut another smaller layer out of one sheet of the 6 x 6 paper for the inner sections of my box,


I stamped the Hippo's out, then coloured them with some distress re-inkers, then when dry I die cut them out into circles,


I kept to the same colour theme as the papers and made some Handmade Foamiran flowers in similar colours too, I used Lady E Design Tiny Flowers dies for these type of flowers,


I created a circle cake shape out of white card stock then covered it with some more of the Maja Design papers, I then added another of the Hippo's from the stamp set but this time after colouring I fussy cut it out, glued a thin piece of acetate behind the stamped image and glued this on the top of the faux cake, I then added some more handmade flowers out of Foamiran using the same Tiny Flower dies and Flower 001 for the others,


Of course an exploding box needs a top, so after making the shape of the lid I glued a piece of the Maja Design paper from the same collection, then I die cut the Congrats die three times out of the white card stock together, this gives fabulous depth to the text,
I then die cut some stars out of the same Maja Design Shade of the Monochrome I'd used inside, these I doubled up the layers, it doesn't matter if they are slightly offset I think it adds to the appeal,
I then added some more of my Hand made Foamiran flowers on too,


Happy Crafting!!

Saturday 1 June 2019

Viola's for you

Hi guys, you may have seen Emilia from Lady E Design had created some new dies for you,

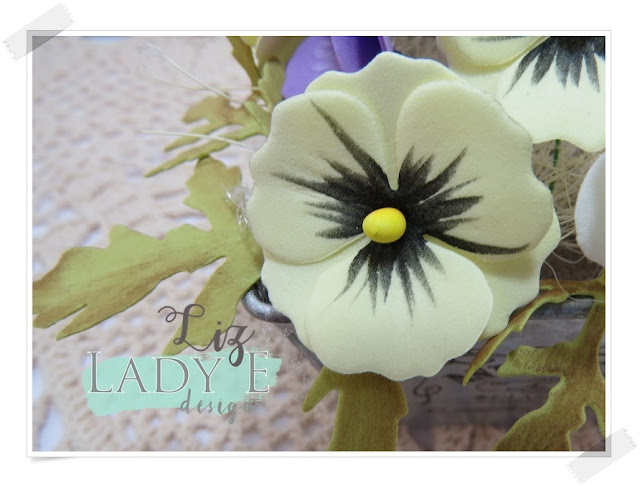
They are fabulous I can tell you, for this time I have used the Flower 6 - Poppy dies, these come in a few sizes but I have just used the smallest flower size and the two leaf sizes to create my flower display,

As you know the're called Poppy but this time I fancied making them into Viola's they do look awesome as poppy's too,

I used some Lemon 0.6 Foamiran and coloured the centres with some black copic pen, I also coloured a stamen with some yellow copic pen too,
I shaped the top one using a ball tool onto a piece of deep foam simply pusing the flower head down into the foam, this gave a little shape to the top layer,

I used some Lilac foamiran for some of my Viola's painting the centre of these with some white Posca pen, then I coloured the stamen with some lilac coloured copic pen,
I coloured some white Foamiran with some yellow copic pen and coloured the stamens on these again with a copic pen,
I layered two of the same size and coloured flower heads together to make all the flowers then made a small hole in the middle and inserted the wired stamen through, 
I got a metal pot from in my stash and added some oasis inside, then added a layer of natural sissal over the top, I then added my flowers to the look I wanted,

I cut some of the leaves in both sizes in Olive Green 0.6 Foamiran then coloured some of the edges here and there with some brown soft pastel,  and glued them in place on the bottom of the flowers so they hung over the rim of the pot,
check out the other awesome makes by the Lady E design brand Ambassadors too,

I can't wait to play with the other dies so exciting!!!


happy Crafting!!