https://lizscreativecorner.blogspot.com/http://lizscreativecorner.blogspot.com.au/p/my-canvases-and-altered-art.htmlhttp://lizscreativecorner.blogspot.com.au/p/my-tutorials.htmlhttp://lizscreativecorner.blogspot.com.au/p/challenges_24.html

Pages

My Lovely Friends,

Thursday 17 June 2021

Vintage Coasters

 Do you love to create items you can use for the home? I do occasionally and when I saw these MDF round beer mats from the

Calico Craft Parts online shop,

 I knew I had to use some, but as Coasters,

I needed to replace my coasters as I have a puppy and it ate nearly all my coasters when younger, not a good look I can tell you, so thes are to replace those as she now behaves,!! lol


You can decorate the coasters in so many ways, but this time I had some vintage themed Rice paper in my stash so following on from that I also added some crackle to add to the vintage look,

I started them all off by first painting a couple of fine layers of white Gesso to one side of the coasters,


while these dried I had some cork type material in my stash so I cut one circle each for the bottom of each coaster, this will help the coaster staying in place when being used,


I did the same steps for all the coasters but I will show you the 3 different coasters as I tell you what I did,


So the gesso is dry and I've cut out the Rice paper design, taking a soft brush and some all purpose medium, or you could use decoupage medium too, glue the Rice paper down in the centre of the coaster, I popped some of the all purpose medium on the top half of the coaster and went over the Rice paper with a fine brush with a little more of the medium on so that any air bubbles was got rid off, then I did the lower half of the Rice design following the same steps, then again going over with some of the medium, this makes sure it sticks well on the edges too,


Let these dry completly, I then took some 2 part fine crackle varnish which I painted over the whole coaster including on the Rice paper, I went over in one direction up and down then right and left to get the desired crackle effect, I let this first stage dry for 2 to 3 hours, then went over with part 2 of the crackle paste, using the same method as the first, I let this dry again for a few hours,


The next stage was to add some antiquing paste I have again in my stash, this fills in the cracks, I then went over with a clean soft cloth to remove the excess, 

Then I gave all 3 a coat of matt varnish to add some protection, and adhered the cork circles on the back side of the coasters,


I do hope I've given you some inspiration of one way to decorate the coasters, or of course they can be used as Beer Mats or soft drink mats,

MDF Beer Mats

 Happy Crafting!!


Thursday 3 June 2021

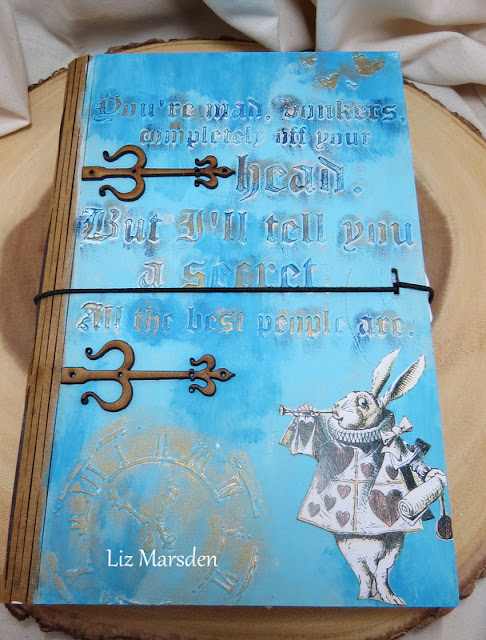
We're all a little mad here

 Hi guys, I saw this fabulous Mdf Journal book on the Calico Craft Parts website, you can buy it with inner sections for 5 different layouts, I chose the one with 2/ 4 sections this time, these I glued together and adhered into the base inside,

I will start with the outside front cover, which I painted with some acrylic paints in a couple of shades of blue, I painted the lighter shade first, then when dry went over here and there with the darker one, I let these dry completely, I painted the inside sections at this stage too,


I wanted to make the journal with an vintage Alice in Wonderland theme of which I had in my stash some images and a stencil, so taking the stencil and some modelling paste I stencilled through the word stencil placing it towards the top so I could adhere an image lower down,

I also used a hearts and clock stencil at the opposite corners of the journal front to balance it up,

when all the stencilling was dry I went over the top using some waxes in blue and gold, this highlights the stencilling, and kept the vintage look,

I then added these fabulous small Fleur-De- Lis hinges on the front,I kept these in the colour they came in to match with the book spine which I had left as it came too,


The journal comes with a piece of Mdf you can use to close the journal with, I haven't used it this time though as instead I used some stretchy string to go around the cover and back,


I cut down a scene of the Alice papers I had in my stash along with some Emphemera which I adhered onto the back of the front cover, this gave interest with out being to bulky,

I gathered together some more die cut images, flowers, another saying and a bottle which I had filled with glitter to look like the Potion Alice drinks, then on one of the sections I used the adorable caddy kit add on in small, for the mdf Tea, teapot and cups which of course fit brilliantly with the Alice theme, these I again kept in their natural colours as the inside spine to make it all mix and match,


These are so useful !!!and can of course be painted etc if needed,


I created this for my Granddaughter who loved it!! 

Calico Craft parts:

Journal tray 

Caddy Kit add on sheet - Tea Set

Hinges - Fleur-De-Lis


Do check out these and lots more Mdf and Plywood products at reasonable prices,

Happy Crafting!!