https://lizscreativecorner.blogspot.com/http://lizscreativecorner.blogspot.com.au/p/my-canvases-and-altered-art.htmlhttp://lizscreativecorner.blogspot.com.au/p/my-tutorials.htmlhttp://lizscreativecorner.blogspot.com.au/p/challenges_24.html

Pages

My Lovely Friends,

Sunday 30 September 2018

How Cute!!

Hi guys, I'm here again today to show you one of the latest releases from Sherri at My Besties, when I saw this utterly cute adorable image 772 "Snowman Bestie Birds Nest Dolls" I knew I just had to colour it up using my distress inks, I've not used them for ages but totally enjoyed using them so I may be using them again soon, lol


I used a Go kreate die for the main card shape covered with some maja Design papers, in between the layers I used a Noor Design snowflake die and a Memory Box  Bramble Circle die, this I cut in Kraft card stock to bring out the browns in the colouring, I aslo used the same Kraft card stock for the trees then I used some Maja Design paper for the leaf effect at the tops, I also used the new die by Lady E Leaves 004 again cut in Kraft card stock to tie it all in,


I added some stickles glitter on the places were the snow effect was needed, I do love a hint of sparkle for winter Christmas cards, 
Do check out this and all the other gorgeous images and products available at My besties,
Happy Crafting!!

Saturday 29 September 2018

Check this out!!!

Hi guys, over at Swedish House Crafts we have some exciting news we are published in the latest issue 183 of
Simply Cards And Papercraft 


There are some fabulous inspiration from some of the design Team for you to look at and see step by step on how we created our projects,


Also Suha has some fabulous discounts for readers on these fabulous collections,
Gummiapan Advent Calendar
Magnolia Christmas Calendar
Bugs Kisses And Halloween Wishes

Here's a quick peek at my creation, for all the details of the products used and the step by step tutorial you can buy the Magazine from your local craft magazine retailers
 or for this issue only!!


Our special offer from Swedish House Crafts, 20% off this issue at this link. 
Discount code: SHC20 

For 20% off SCP: https://www.moremags.com/papercrafts/simply-cards-papercraft


Happy Crafting!!

Tuesday 25 September 2018

A Dabble At Doing A Mixed Media Canvas

Hi guys, are you like me and like to play with something different at times? I am in the mood for mixed media at the moment, not doing this all the time means I only have what I have in my stash but I really enjoyed playing!!! Lol


So I started with a deep edged  canvas and added some sprays from my stash, I wanted the clock effect to stand out so I kept the background paler, I added a little detail with out depth by spraying a bit of the Prima spray directly onto a sodden scrunched up kitchen roll piece then lightly dabbed it here and there on the canvas, including the sides,


When dry I placed the Dusty Attic Skeleton clock chipboard roughly were it would be fixed then I knew where to place the text, so after removing the clock chipboard I made the text out of a stencil and  some texture sand paste because guess what, all my other pastes had dried up and died!!!!!!!!!!! I mean what! don't you know I want to create!!!!!!! Lol anyway the paste I used wasn't as bright as I really wanted so after drying I placed the stencil back over the top and dabbed some  white ink over the top with dabber, this worked better then the paste and finished up being a subtle colour,

I went over the clock with some white gesso, then when dry with some crackle paste, I added a little script stamping here and there too, then when this dried I added a little diluted acrylic paint here and there,


I glued the chipboard Clock in place on the canvas and while there was some space I took a texture stamp in my stash and some grey ink from a memento ink pad and stamped the pattern here and there too, if you look closely you can hopefully see it and the paint effect made the kitchen roll I described before,
Taking one of the smaller Skeleton Clock faces I painted this with some brown acrylic paint this time leaving the chipboard without the crackle paste, I then added some metal embellishments in my stash,
these I added some texture sand to in places then when dry went over with some white Gesso, acrylic paint and some waxes, keeping in with the colours,


While these set I took the adorable Dusty Attic Bearded Iris and again added some of the texture sand on the flower head only, when dry I coloured the heads with a couple of colours of some matt chalk effect paint I have,


then in the centre of the petals I used some Frantage  and heat set this,


I simply painted the stems with more acrylic paint then glued them in place over the smaller clock and metal embellishments, I love how these peek out from behind the main flowers,


I finished the base of the flowers off with some more Dusty Attic Chipboard and some Art Stones,


On top of these I added a metal butterfly from my stash, I deliberately kept this as it came, I also added one on the other side to balance the look,


It looked a little bare on the corners of the canvas but I still wanted the clock effect to be the main eye focal  point, so I added a couple of Dusty Attic corner scrolls #2, these I again painted with some acrylic paint from my stash, but as with the paste It started running out so I had to really dilute it,  but by doing this the colours became subtle and helped take the focal point off them, I then went over the Dusty Attic Foliage leaf with the same paints to blend it all in,

Well you girls who do Mixed Media perfectly are probably cringing now, but I had fun and didn't let the fact that my stash is low, dying or dead!!! put me off and I quite like the effect it finished up with, Lol
Sheen Douglass stamp
 Prima 3D Matte Gel ( fixed the media onto the canvas with)
Prima - Art Stones
Decoart - Texture Sand
Prima colour bloom mists
Deco art- Acrylic paints
Silk paints
Prima  white Gesso
Dusty Attic -
 Foliage
Skeleton Clocks
Bearded iris
TCW - Mini stencil
Metal embellishments - stash
Frantage and aged copper waxes

Sunday 23 September 2018

Exploding Winter Themed Box

Hi guys, I thought I'd show you an exploding box I made using the fabulous Lady E Poinsettia die flowers I showed you a couple of days ago,


As you can see I used the one I heat set and coloured all the petals with the Versa Colour ink pad, I then used the Poinsettia middle that came with the die set too, In the middle I fixed a pearl embellishment from 14 Craft Bar, Underneath the flower I used another of Emilia's new dies Leaves 004, these I cut out of Kraft Card stock, simply cutting down along the leaf stem so I could use them in the places I wanted, they look fab with the stem left whole too, I love that you can a die more then one way!!
Underneath that I also used another of Emilia's latest dies Tiny Leaves, these I kept whole and cut the die twice out of some Maja Design paper then edged the leaf edges here and there with a little distress ink and shaped an odd one with my fingers too,


I added some hints of glitter glue here and there too, I love making exploding boxes but forget how hard it is to photograph them, lol


Inside I made a smaller Poinsettia using the smallest die from the set and just using two layers of the 0.6 Foamiran in white, I only coloured the middle of the flower too, as you can see I used the same flower middle and used a similar pearl middle again from 14 Craft Bar, this time I only used the Leaves 004 die again in Kraft card, these dies cut like a dream even in the kraft card stock,
I used these to finish off my winter scene, hope you like it!!

Happy Crafting!!

Friday 21 September 2018

Foamiran poinsettias

Hi guys, I've been having a play with the latest Poinsettia die by Lady E Designs, I've made them a couple of different ways just to show you and depending on the look you want too,


I made all three out of 0.6 Foamiran in white, from 14 Craft Bar, which I coloured with a  Versa Colour ink pad in 64 Khaki,


I coloured all the petals on this one with the ink pad keeping the petals fairly flat only slightly cupping the middle a little in the middle of each petal, for both of these Poinsettias I only used two layers of the largest  flower die,


I made this one the same way but I only coloured the centres with the same ink pad, I then used some Kraft coloured cardstock for the flower centres, this I sprayed lightly with a little water and slightly shaped the outer upwards and  towards the middle,


This one I did with three layers again using the largest Poinsettia die and the flower centre, after colouring all the petals I then heated each petal at a time on the iron for a second or two then immediately placed it on a foam pad and pressed down in the middle of the petal with a ball tool, this makes a more cupped shape and it tends to stay raised as you've used the heat, again I used the flower middle then I simply added a pearl centre in all the flower which again came form 14 Craft Bar, 

Hope you can see the difference, Lol
Hugs Liz xx


Wednesday 19 September 2018

Merry Christmas

Hi guys, I've another Christmas card to show you today made for the
My Besties Shabby Chic design team,


I used this adorable Img from the latest Sept Release

She's coloured with my copics and distress with some distress ink on the edges, I also distressed the edges of the papers with my distress tool,


I added a little Glamour Dust onto the image too for a little sparkle, I finished my card off with a handmade foamiran flower made with one of the new Flower dies  004 by lady E and her new Tiny leaves Die too,
Check this out and all the other gorgeous images by Sherri,
Happy Crafting!!!!

Thursday 13 September 2018

Autumn Birthday

Hi guys, it's my Brother in Laws Birthday soon and I was at a loss what to make, then I saw the Dusty Attic Mood Board for September which was perfect!!! lol
He loves the outdoors and nature and the mood board along with the colours was fab for what I had in my stash and what he loves, 


I started off with some corrugated card which I used on the base of my card, simply adding some paper by Lemoncraft over the top which I had distressed on the edges and tore back in a couple of places,
I've had this stamp for a while and it fit in perfectly for the theme and the colours of the mood board too,


Over the top of the image I coloured some Dusty Attic Lavender in some crackle paste then when dry I went over with some acrylic paint, I then highlighted this here and there with a little distress ink,


To keep in with the natural theme again I used some burlap fabric and cut out a couple of simple flower shapes, then added a few of the fibres from the burlap too, I finished it off with a metal embellishment,


On the mood board was some twigs and a bird so I die cut some twigs and used one of the fab D/A chip board birds which I again added some crackle paste too then coloured with some acrylic paint,


Some more twigs and leaves which I glued in front of a mini fence by Dusty Attic which all were on the mood board as well,


Then for another bit of added interest I used some Dusty Atic mini chicken wire coloured the same way with acrylic paint then I added some bronze micro beads here and there too,


September 2018 Mood Board
Here is the fabulous Mood Board, so I used:
Colours, twigs, leaves, outdoors, bird, cloth/fibres, Fence,


Check it out here at
http://dustyatticblog.blogspot.com/
Challenges:
 Dusty Attic - September Mood board 
Happy Crafting!!!

Tuesday 11 September 2018

Joyous Winterdays

Hi all, today I thought I'd show you a tag I've made for the Winter/ Christmas season because "yes folks it's coming", for Swedish House Crafts, there's still a sale on in the online shop so check it out if you've not already done so, more details below

 we've had a few cool days already and I am so not ready for Winter clothes etc!!! Lol


I made the base for my tag/card out of the fabulous large Gummiapan tag die, I love it, it cuts a dream even through thick card or as here one thick card folded in two to make the shape of a card, you could of course use it for a tag, I love it when you can use a die for more then one thing, he he
I used some of my favourite papers by Maja Design from the Joyous Winterdays collection, (list below) after cutting out both papers with the tag die I then cut the shape I wanted with my scissors then distressed the edges with a distress tool, as you know I love the shabby Chic look,
I added a Gummiapan Stockholm stamp on the top corner a couple of times to add a little added interest,

I took the Gummiapan snowflake die and cut it out a three times in the same card stock as my base then added some frantage over the top and heat set it, when dry I glued these behind my top layer of paper,


I wanted my top layer to be raised up more so I added some foam pads behind before fixing on to the top of the base layer, at this stage I went over the tag edges with some vintage photo distress ink,
 I then used some Twine from my stash, I fixed some of the beaded berries on one side of the twine too, 


I just adore this adorable snowman die again by Gummiapan I cut out him out twice again out of the same card as the base, then coloured and fussy cut the hat before I glued it on top of the other one,
I added some ric rac from my stash for a tiny scarf, isn't he cute!!!! 


On the right hand side I added another die ( From farm to market - market fence)  this time made by Magnolia, it's a perfect size to go with the tag and the Snowman, in front of the fence I used the same snowflake die but this time out of some Maja Design paper which looks more like foliage, I then added some liquid applique here and there for a snowy effect,

Products used:


Now as I mentioned Suha has a fantastic 50% sale, it's still on for a few days so pop on over to her shop and maybe catch yourself a few bargains, or maybe Christmas presents for another crafter, 

Happy Crafting!!!

Friday 7 September 2018

Christmas card with easy Poinsettia tutorial

Hi guys, I've made a Christmas Card this week!!!!!!! EEKK!!!
Those that know me know I don't really usually do Christmas till November and then usually under duress, lol so I am Ill? do I need my temperature read??
No really I just wanted to try Emilia's gorgeous flower die Leaves 002 as a Poinsettia styled flower, I have used this die a few different ways for a range of flowers, you can of course use it for a calyx behind other flowers too,
anyway here is how I used it this time and it looks fabulous but it's really easy to do,
I will give the tutorial for the flower below,


I started off with some paper in a blue colour then using a Tim Holtz stencil I used some paste through for a design on the base of my card, I let this air dry,


I've had this gorgeous snowflake in my stash for ages, to the side I glued some natural fibres and used these as my first layer then added a pair of skies over the bottom of the snowflake and too the side of the natural fibres, 


Next I glued my made up Poinsettia flower on the side then added some silver berries I bought from The Range, along with some pine cones and some die cut leaves, I also found in my stash a couple of gem stones,
Then I added a little white Gesso here and there to finish the card off,

Easy Foamiran Poinsettia tutorial:


 Die cut two of the largest and next sized down Leaves 002 dies for each finished Poinsettia flower, in your chosen Foamiran I used 0.6 White,


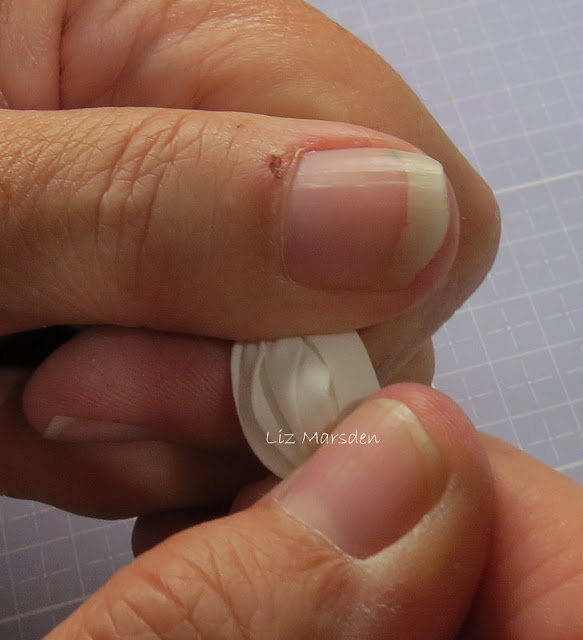
Take one of the flower heads and fold the petals together as best as you can, the scrunch the ends of the petals only backwards and forwards between your fingers till they look similar to above, do this for each flower die,


Carefully ease the flower heads open, slightly shaping the middle part of each petal by easing them outward between your thumbs, (do this slowly and carefully so as not to tear the Foamiran)  trying to keep the ends scrunched as shown,


Layer the two largest flower heads together off setting the petals, then glue the smaller two the same way on top of the larger two,


Make a hole in the centre of the flower and thread some stamens of your choice through, 


Glue the stamens in place behind the flower head to set, you can use hot glue or as I have this time Beacon 2- in 1 glue,

Remove the wire and leave to dry if using the glue I used,


When dry cut off the excess stamens and use your flower how you wish,


I kept mine very simple, you can of course colour the petals or use a coloured Foamiran, or add glitter if you wish, maybe that's for next time!!! Lol
Well I hope you can see how easy it is to make one of these flowers,

Lady E Leaves die 002
Foamiran 0.6 white
Happy Crafting!!