https://lizscreativecorner.blogspot.com/http://lizscreativecorner.blogspot.com.au/p/my-canvases-and-altered-art.htmlhttp://lizscreativecorner.blogspot.com.au/p/my-tutorials.htmlhttp://lizscreativecorner.blogspot.com.au/p/challenges_24.html

Pages

My Lovely Friends,

Saturday 29 May 2021

Alice Themed Journal

 Hi guys, i've been really busy with life at the minute, so in between having to sort stuff out I've dabbled with a journal for my Granddaughter,

I'm really new to these, so haven't really got a clue what I'm doing!! lol

Anyway I'll show you what I've created,


I bought the adorable Alice in Wonderland themed kit from

The craft box uk

with gorgeous papers, images chipboards, stencils and charms, this time apart from one of the charms on the closure I've kept it to the papers and images,


The inside has some signatures, while on the front inside cover I created a pocket with a strip pf the paper, then I added one of the smaller paper pads sheets as a removable section, she can write on this or just see the image,


I used a few of the papers for the Signature section, so I'll go through them,


I added some lined paper inbetween some of the papers for her to add her own writing or drawing,


Here I added a ticket effect using one of the images from the smallest paper pad, I used one of the emphemera images on the opposite page simply adhering it down over one of the papers,


Here I used another emphemera piece, along with a tag shape again cut from the smaller paper pad, then I stamped one of the stamped verses that again came with the kit,
I left space again for her to create!


Another page for her creativity, with a folded trifold section on the other side, this I've tied with twine,


These are cut slightly cut down images to fit the base card, so it folds up,


The back section I have again left plain, I could of course added more but for this one I wanted her ideas to flow too,

The signatures are hand sewn together, then I used some stretchy string to fix them into the album,

I had fun creating this, I think I may do more, lol
Happy Crafting!!


Friday 28 May 2021

To someone special,

 Just a quick post sharing my hubby's Birthday card I made for him today, using the stunning stamp by 

Shokart from Dalimarket,


After stamping the image twice I decoupaged the bird over the other with 3D foam, then added keys, moss and some gems from my stash,


Happy Crafting!!

Thursday 20 May 2021

Timeless Beauty

 Hi guys, I'm back today with another dt post for

Calico Craft Parts,

Have you seen the amazing MDF and Plywood pieces they have in their online store? do check them out thery are well worth a visit,

So today I have altered one of the MDF House shaped mixed media boards, so many possabilities with these but this time here's what I created,


I also used the Mini MDF wood windows and the Panelled door with frame,


I gave them all a coating of white Gesso,


When dry I used a couple of stencils from my stash to decorate the House, this gives depth and added interest to the base, 


I adhered the windows of which I glued two single ones side by side both times to create a larger window effect, then I adhered the Door which I had previously painted with a light Patina effect paint and I had used some stone effect paste on the door frame,

I added some brown paint to the window frames and another layer of white Gesso along with some crackle paste here and there too,


I went along the outside edges of the house with some distress ink, this gives a little definition to the house, as you can see I wanted a rustic look to the house so I went for a random look,

To finish off I took some flowers from my stash and adhered them as shown, then I adhered the Butterfly on top of the flowers and one on the top of the House for balance, these again I had first painted with white Gesso, then when dry a light Patina paint,

I hope I've inspired you to have a go,

Mdf House shape - Mixed Media Board

Mini Butterflies - Style 4

Mini Wood Windows - Wood Shapes

Panelled Door With Frame - style 8

Happy Crafting!!

Thursday 6 May 2021

Quirky Themed Phone Stand

 Hi guys, Gosh it's gone chilly again as I'm writing this, I hope the sun returns soon,

to cheer myself up I altered this fabulous Plywood phone holder from

Calico Craft Parts


The holder fits my phone easily and even has space for the charging lead to go through while it's sat there, Lol

I have a small tutorial on how I got this look,


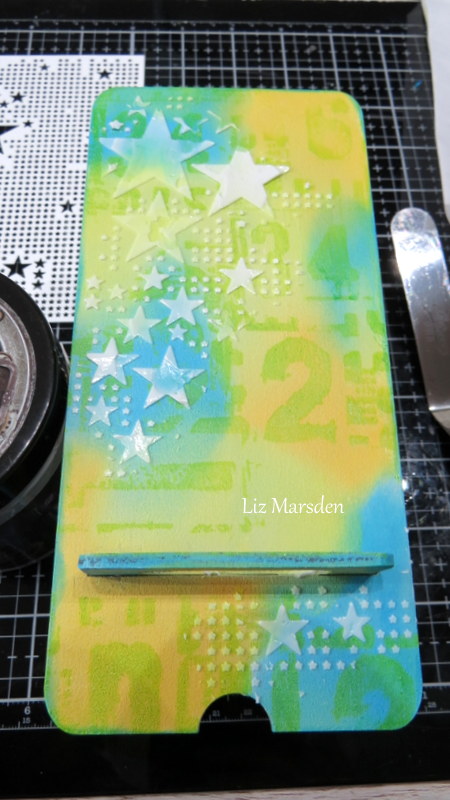
I glued the sections in place by placing the back section through the pre cut slot on the front as shown,

I then painted a fine layer of white Gesso over all the sections, when dry I took some benders with three colours of Distress oxides and randomly added colour to the sections, going over the other colour where it meets to blend it in, I used Blue Lagoon, Twisted Cirton and Fossilized Amber, next to stop the inks coming off I lightly sprayed the surfaces with a cheap hair spray, let dry,

I then stamped onto the sections, using Versafine Clair in Verdant, this went with the colour's I'd chosen but still showed,


As you can know it already has the back stand attached, so to make it easier to stamp and do the rest of the media on it I took a mixed media tub I had in my stash, (any tub will do as long as it's roughly the same height or a little bit higher as the back stand, but it needs to give a firm surface to be able to place your stamp on, (so the front surface is flat to work on)

This is the stamp pad by AALL and Create with the ink I used to stamp onto the surfaces, I didnt add my stamp to an acrylic block so I could press my fingers on the back of the stamp to get it into smaller sections too, this gives a variety to the stamping too as some are more defined then others, (this adds to the effect) let this dry as the ink will remain wet for a while, you can use aheat tool lightly over the top, but be careful not to burn the plywood,


Next I took a star stencil with some Modelling paste, this I randomly spread through the stencil here and there, again some parts missed or were thinner layeres, I wanted this effect as it gives the quirky look and lets a bit of the colour show through,
Leave to dry naturally, if you use heat it could make the stencil paste bubble, I didn't want this as I wanted it kept flat,


I had stamped coloured and fussy out out the bird images, then adhered them onto the front over some of the stencilled stars as shown, again I kept these flat to the surface of the phone holder, I decided I wanted a little more stamping at this stage so using a smaller text stamp and Versafine Clair Nocturne ink to make it stand out a little more I randomly placed it here and there, again I used just my fingers for the stamping to add small sections,


I used another stamped bird facing the opposite way, placing it lower down on the holder, glued in the same way,


I fussy cut out a sentiment on a separate piece of card, then glued it in the middle again keeping it flat,


And there is my finished quirky themed phone stand,
Just the thing to brighten up a dull day!! lol


Happy Crafting!!