https://lizscreativecorner.blogspot.com/http://lizscreativecorner.blogspot.com.au/p/my-canvases-and-altered-art.htmlhttp://lizscreativecorner.blogspot.com.au/p/my-tutorials.htmlhttp://lizscreativecorner.blogspot.com.au/p/challenges_24.html

Pages

My Lovely Friends,

Friday 10 December 2021

Oh Christmas Tree....

 Hi guys, I'm back today with another Guest Design Team make for

Decoupage Queen,

This time I've used the fabulous 12" x 12" Scrapbooking papers from the Christmas Collection,


I couldn't resist making an exploding box to show off all the fantastic papers and images from them,


For the lid of the box I used one of the papers as the base, then I fussy cut out the golden wreath image and the Bird, I then layered these up with some 3D foam under the bird, I used some berries from my stash and an odd Sequin or two plus some Chipboard words from my stash to finish it off,


The sides of the lid, have this gorgeous bauble effect paper which I cut down off one of the sheets, then I adhered some string with some bells that jingle when moved,

I also fussy cut out a red bauble off the papers and applied it on the outside front section too,


The box has two layers, the middle layer on the upper side has more of the papers, which I distressed on the edges, here I die cut out a tag shape from another of the papers, then added some Tim Holtz Ideaology metal stars, along with another Sequin,


The front section has this adorable pair of birds, again fussy cut then layered up with 3D foam,


The right hand side section, has some sequins and gold self adhesive effect pearls here and there, to tie in with the paper design,


The back section has this majestic stag from the paper, so again I used one of the metal stars and a sequin to finish it off,


On the reverse of these inner sections, I have used this gorgeous sheet of paper to bring in the red, two are plain and the two sides have an added embellishment,


I have adhered a glassine envelope on each side section for some money to be added as a gift, I then simply fussy cut some more images out to adhere on the fronts,


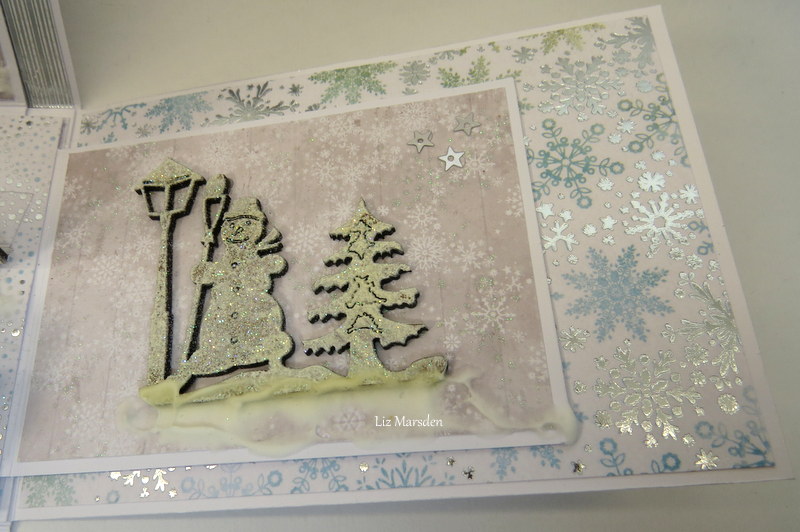
For the centre section of my box I have created a scene from some wooden houses and a tree from my stash,


Onto these I have added some structure paste here and there for snow effects, I fussy cut the parcel again from one of the papers to finish the scene off,


I added a battery tealight behind the house at the rear, to give some light effects, closing up the sides and back of the box and popping the lid back on allows the glow to be seen a little better,


When it's dark it gives a rosy glow to the scene,

I hope I've inspired you to have a go, the papers and images are stunning and I really enjoyed creating with them,

I wish to thankDecoupage Queen, especially Iveta for the invite and the beautiful papers and Rice papers I received,

Happy Crafting!!

Thursday 18 November 2021

Believe in the Magic of Christmas

 Hi all, well Christmas is just around the corner, so for one of my projects I decided I'd create another exploding box using some of the fabulous MDF Pieces from

Calico Craft Parts,

So the top has this gorgeous script 

Believe in the Magic of Christmas, in Ancestry Font


All I've done to all the pieces I've used is coat them with white gesso, then when dry add some glitter over the top, the sparkle in real life is beautiful,


On the back section of the box, I used this fabulous Trees scene,


This Child Pulling Christmas Tree on Sled 

 also had some texture paste at the bottom added to give a snow appearance, 


This is one the other side of the box, and features

Snowman and Lamp Post scene

On the front section I added a sled again with the snow effect beneath, this one is a Slatted Sled

For the centre piece I used one of the gorgeous MDF windows,

Gothic Arch Stained Glass Window style 1

I added some white Vellum behind this,


Then added a single Tree in front to create a scene,

Christmas Tree - style 5

then some parcel effects too,


I left enough room behind the window, so I could add a battery tealight, love how this makes the window glow,

Happy Crafting!!

Friday 12 November 2021

Magical Midsummer Part 1 Video Tutorial

 Hi guys, I have a video tutorial on my youtube channel for

Del Bello's Designs with the first part of how I created this card,


I would love to know what you think of my video if you decide to watch it,

Thank you !!

https://youtu.be/UlRDPZrwm0A

Happy Crafting!!

Saturday 6 November 2021

Winter Wonderland

 Hi Guys, I thought I'd pop this card on today, 


It would be great for a Mans Christmas card, 


So the card base is 5" x7" with the inner section about a quarter of an inch smaller,

I created the ground snow effect using some torn copy paper and some distress ink in pumice stone, going in small circular motions along the torn edge of the copy paper, I repeated this again to create the effect,

I used a circle mask from my stash, Lavinia stamps has a mask with some cut out for fabulous moon or sun effects, on the moon I created  I used some Neautral Grey Panpastel placed here and there with my finger tip, to give some pattern for the moons surface,the sky is created using circular motions with a soft brush using  Distress Ink

Next I inked up the 092 Pheasant stamp by Lavinia using versafine Claire in Nocturne, on the left hand side,


On the right hand side, I used the 022 Fir tree and the 094 Fir tree stamps, again using the Nocturne ink pad again, I placed them at different heights and places on the card to give a 3D effect,


To finish off my card I watered down some white Gesso and painted it along the fence sections and at the base of the trees, then along some of the tree branches,

I used a fan brush with some watered down white Gesso to flick some paint on the sky area, a little went on the Pheasant too, which I liked,

I used a text stamp from my stash for the sentiment,

 Del Bello's Designs

LAV Fir tree 1 094

Fir tree 022

Pheasant 092

Lavinia Acetate  Moon masks

Lavinia Acetate Hill Masks 

Panpastel - Neautral Grey 

Versafine Claire - Nocturne

Multifarious Card A4

Happy Crafting!!

Thursday 4 November 2021

Merry Christmas

 Hi, well Christmas is fast approaching and so I thought I'd show you one of my makes for this year using the Gorgeous MDF round lace cut bauble with optional backing piece, from

Calico Craft Parts,


I used distress oxides on the base of the card and on the optional base of the Bauble,

then on the top layer after painting with white Gesso I went over with some fine Glitter, this really sparkles in real life, I finished it off with some gems,


Round MDF Lace Cut Bauble with optional backing piece,

Happy Crafting!!


Sunday 31 October 2021

Christmas Bauble with distress inks

 Hi guys, just letting you know I'm here with my first video for

Del Bello Designs,


I used the gorgeous Sweet Poppy snowflake stencil with some Card-io stamps all available at Pattys Del Bello Design online shop,

here is the link to the video,

https://youtu.be/UWhs1_LY5o8

Happy Crafting!!

Thursday 21 October 2021

School of Magic

 Hi all, I'm here today with my last Halloween project for

Calico Craft Parts,

as I've said before I love creating Halloween projects and I love the way this one came together,

I also used some of the awesome halloween scrapbooking papers and images from Decoupage Queen,


I've created an exploding box with lots of the fabulous MDF Calico Craft Parts pieces. both outside the box and in,


So on the lid I used the spooky Halloween letters, these I gave a coat of white Gesso too, going very lightly and not worrying if it missed parts, it all added to the distressed look,

I also added one of the Spider webs, this I painted with black Gesso then when dry sprayed some silver waterbased paint over,


On the back section I added one of the Ghosts, placing it so it would show behind the House (school) in my case!! lol


On the left hand side, I added a couple of bats,


The front sections, have the fabulous RIP which I kept in it's original colour, then adhered the Spider and Owl corner on the inner section, this is just painted with Black Gesso,


Yet another Ghost is used on the right hand side,


My main image is made up of the haunted House, which again I decorated as the Spider web and added some vellum on the windows,


In front of the house I used the Skeleton trees,


After adding some moss I places some bones here and there,


To give a scary effect for at night, I added a battery tea light behind the house, 

SOOOO SPOOKY!!!

Haunted House with Tower

Skeleton Tree Duo

Bones

Flying Bat Colony 

Spider Web

Owl and spider Corner

RIP Gravestone and Pumpkin

Ghost style 2

Ghost style 3 

Happy Crafting!!

Sunday 10 October 2021

Four looks from one stencil

 Did you see the fabulous stencils etc on the Cleverprints show on Saturday?

if you were lucky to get some I thought I'd show you some ways to use one of the stencils,

I used the Lollipop 024 stencil, but it can be used with any others you may have bought,

(1)


This effect is created easily using distress oxides simply brushed through the stencil,

colours used are Fozzilized amber, Mermaid Lagoon, Twisted Citron


(2)


Taking the stencil you have just used with the distress ink still on, spray a light coating of water over the top of the ink,


Place sprayed stencil down onto your card, and lightly press down,


Lift off carefully and either leave to dry or use a heat tool to dry,


(3)


Lay your stencil onto a piece of card, work some Gesso with a craft knife till smooth,


Add a small amount to a piece of foam, I use a cut up washing up foam


Lightly dab the Gesso through the stencil leaving a light layer,


Remove stencil and leave to dry, it won't take long!
place your stencil in warm water to clean,


Go over with your chosen distress oxides or other colour mediums, lightly over the top,


Take a slightly damp cloth or wet wipe, and go over the card, removing the colour from the Gesso, repeat moving the cloth around the design and moving the area of cloth you use, so you don't keep adding back the ink,


This gives a soft look to the design,

(4)


Add your chosen colours to your card, using circular motions and a soft brush,


Contine with the other colours, till the card is covered,


Place your stencil over the card and using stencil paste or modelling paste with a spatula or other similar tool stencil over the top and through the design, lift the stencil off carefully and place the stencil straight away into some warm water!
Let your paste dry, some pastes will take a heat gun but can bubble, this effect can look good if you're after it, otherwise leave to dry naturally,

So that's four different looks from one stencil and the same range of colours, you can of course do lots more too,

Happy Crafting!!