https://lizscreativecorner.blogspot.com/http://lizscreativecorner.blogspot.com.au/p/my-canvases-and-altered-art.htmlhttp://lizscreativecorner.blogspot.com.au/p/my-tutorials.htmlhttp://lizscreativecorner.blogspot.com.au/p/challenges_24.html

Pages

My Lovely Friends,

Wednesday 29 August 2018

Too Cute To Spook

Hi guys, I thought I'd show you another creation I've made for the latest August release
This time I've also used some of the fabulous Digi  Fall - You Drive Me Batty papers too,


As you can see I've made a box style creation using the papers on the outside and the lid,
To make it more Shabby Chic, I distressed the edges of my papers and added some lace and flowers keeping in with the colour theme,

For the spider web border I die cut four out to go around the box then I added heat embossing powder in silver and glued them in place when they had  been embossed,


This is the inside, I coloured in the cute img 021 from the  Happy Fall/ Halloween collection with my copics then fussy cut it out, I applied a little acetate behind the cut out image so it would stay in place with out showing, I then die cut a pumpkin and attached that the same way,
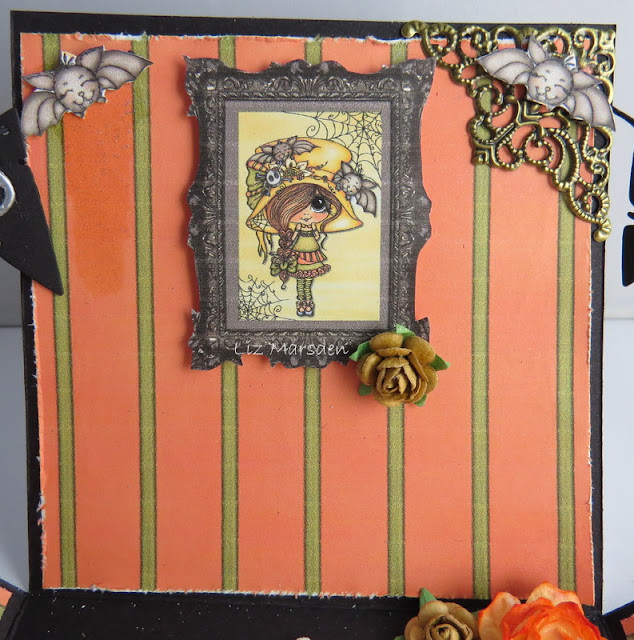
Using one of the papers I made some wall paper for the walls of my exploding box, then using another of the papers I printed out this one with this frame which I simply fussy cut out around it, then I added some left over bits of chip board behind to give a 3D effect, I added a tiny rose for the shabby effect,


I took a cat die in my stash and cut it out from black card and added foam dots behind to rise it up a little, above this I added a embellishment from my stash then again a couple of flowers,


On the other side I made a window effect, with a window die and some lace again from my stash,
Have you noticed my banners? I used a banner die with some black card and then used some tiny alphabet dies with some silver embossing powder n the top, I cut out some bat from another of the papers on each side of the string,


this is the finished scene with a tea light on behind the pumpkin for another effect at night, well it is for Halloween!!!!!!!!!!!! Lol,
Happy Crafting!!


Monday 27 August 2018

Happy Birthday 7 Today

Hi guys, As you know I'm on the Shabby Chic DT for My Besties and when I saw this adorable

 Img - 180 "Courtney Dawn Besties from the latest August release I couldn't wait to colour it up for my Granddaughters 7th Birthday,
She's growing up so fast but she does still love her soft toys, you can't see her bed for them, lol


So you can see how apt this image is!!!!!
I coloured her with my copics in blue's because it's her favourite colour at the moment,
I used some Maja Design papers which I distressed the edges with a distress tool and a little Vintage Photo distress ink,
The card shape was mae with a Go Kreate Frilly 10 base die, I cut a Magnolia Doo Hickey die and some Butterflies out of some of the Maja Design papers too,


Then hand cut a banner and die cut a 7 out of the same papers as well,
I finished the card off with some of my hand made Foamiran flowers using some of the Tiny Flowers dies by
 Lady E designs


I added some pearls onto the butterflies and some seam binding on the tag to give the shabby chic look I love and she does too, lol

Check out this and all the other fabulous and adorable images over at Sherri's online shop,
Happy Crafting!!!

Wednesday 22 August 2018

Mixed Media Tag

Hi guys, I recently altered a wooden tag from my stash, using paints, chip board, structure paste, stamps, lace, papers etc, I really enjoyed myself !!!


I started with some Maja Design papers cut to the shape, on the top left corner I added some lace in between , I then painted  over the top pf these with clear Gesso and used my heat gun to set it,
I added some light stencil work with some structure paste and let that dry,
When everything was dry I added some Prima sprays and paints to get the look I was after,
I then did some stamping here and there,

I found this fab French Window by Dusty Attic in my stash and painted the base with white Gesso, when dry I stamped a script stamp over the top, then some crackle paint, when this dried I went over the top here and there with a silks paint to give an aged look,


Behind this I added some antique looking lace,
I glued the Dusty Attic Window in place then added a flower head I had cut in half behind the window frame,


I took some Dusty Attic Bricks and painted them with my silks paints, then glued them in place, I also added some twine from my stash too,


I found some more Dusty Attic pieces in my stash and I glued these beneath the window and peeking out of some paper flowers,


I finished off the bottom of my tag with this devine frame set, I coloured with with a few different colours of silk paints, as well as highlighting the other pieces too, I added a few art stones down the edges and colourd them then toned some of them and the bricks down a little with a hint of white Gesso to give an aged effect,


And this is it in situ in my hall, Lol

Mixed media Place - August Challenge

Happy Crafting!!!

Saturday 18 August 2018

Foamiran flower Tutorial

Hi guys, I've been having a play with one of the Lady E dies Flower 002 to make a different styled flower then I made before,


Tutorial:

Taking some 0.6 Foamiran in pink and the smallest flower head from the 002 die set, cut 4 for each flower head,


Take some oil pastel and colour the tips of each petal on both sides,


Scrunch the tips of the petals together, ,


then using your fingers spread the foamiran slightly apart in the middle section, leaving the top scrunched section untouched,


Take two of the petals and apply a thin layer of glue along one edge of one of the petals, then fix the edge of the second petal over the top of this,


Do this for all four petals, like shown below,


At this stage turn the flower petals over, 


Then glue the flower petals together as before, 


Add some stamens fixed onto a wire with some floral tape around and glue through the centre of the flower head you've made,


I then made a bud style using the same die and  steps but I didn't turn the petals over before gluing the last ones together and I wrapped them around the wire so it made a closer flower head,


Lady E design dies available here,
I hope I've inspired you with another way to use the die,
Happy Crafting!!!

Saturday 11 August 2018

The Dusty Attic

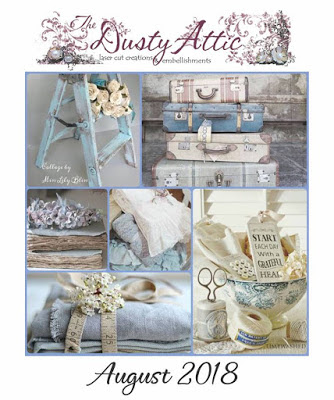
Hi guys, I've been having a play with the August Mood Board for Dusty Attic, have you seen it?
well it's gorgeous colours just up my street with lots of scope for ideas too,
So here is my project for it,


I created an exploding box with one of the gorgeous Dusty Attic french windows on the front, this I first painted with white Gesso then with some chalk paint from my stash, when this was dry I applied some crackle paint over the top to give the allusion of gae and vintage,


On the base of the window I added some of my own handmade Foamiran flowers in toning colours as the Mood Board, Are you Window shopping? Lol


Well here is the inside, I used papers by Maja Design for the walls, distressing the edges with Vintge Photo distress ink then my distress tool which gives a aged feel too,


I took the adorable Elegant frame and removed the middle piece, coloured the frame with the white Gesso then the same colours of acrylic paint as the window and again applied crackle paint over the top, when dry I adhered a piece of mirri Board to the back to act as an antique Mirror,
The Dusty Attic clock on the left I colourd with some old effect wax from my stash then fixed it onto a metal frame in similar colours,


The Mood Board had suitcases on it so I hand made one using papers in the colours, Fixed a metal handle on the front then draped some lacy fabric over the top to tie in too, I then used some scissors, doily and more of my flowers which all fit with the Mood Board,


To finish off my box I added some tags on a banner with the name The Dusty Attic on which is the name of my vintage themed shop Lol,


My Grand daughter has her eye on this to take home, I had to catch it quick or else I'd have no photo's he he

So here is the Dusty Attic - August Mood Board
August 2018 Mood Board
So I used flowers, thread, buttons, scissors, colours, vintage, suitcase, Lace

On the Lid of my box I used a couple more of my hand made flowers plus a Dusty Attic foliage which I left in its original colour,


Challenges:

Happy Crafting!!


Wednesday 8 August 2018

My Latest Foamiran Roses


Hi guys, I've been having a play with a couple of Lady E's dies to make a couple of Roses with leaves,


I used some 0.6 Ecru Foamiran from 14 Craft Bar for both the flowers and the leaves, I then coloured these with some Geletos,


For the larger Rose I most of the dies from the Flower 003 set except the largest, I coloured my Roses with Geletos Aqua Dolce and Elderberry, randomly applying the colours on each petal,I then heat the ends with my iron and scrunched the tops, I turned back the edges on some of the larger petals,


I used the first two sized dies for the smaller flower, again folding back the edges on the outer petals,
I die cut out the leaves, then used a mould to add some detail to the leaves, I then coloured them with some Geletos in Iced Pear and Kiwi,


You can buy these dies from Lady E Designs on Ebay here
Happy Crafting!!!

Sunday 5 August 2018

We've Gone Batty At My Besties

Hi guys, I've been oh hols in Teneriffe so I'm slowly getting back to making my creations, 
Over at My Besties Sherri has created some fabulous Halloween images and I couldn't wait to colour this adorable cute image up,
I started out with a tag shape and I then added some Halloween themed die cuts along the edges, these I cut out of card stock then added some heat embossing over the top and a little distress ink here and there to give a aged look too,


I used a brick effect die cut by Sissix for a little added interest, I die cut out the moon and the pumpkins in card then coloured them and the image with my copics,
I then fussy cut out the image with my scissors,
I finished off my tag with some metal sequins from Swedish House Crafts and some of my handmade Foamiran flowers with a die by Lady E


Copics used:

Skin - C00, C0, C1, C3, C5
Pants - T1, T3, T5
Eyes - YG03, YG13, YG17
Shoes - C5 C7, C9
Green - YG03, YG13, YG23, YG13
Orange - Y38, YR16, YR68
Cape - Vo4, Vo9, V17
Shirt - BV0000, BV00, BV02
Ears - R11, R98
Bats - W00, W0, W1, W3, C0, C1, C3, C5, R11

Do check out this and all the fabulous images and papers etc you can get over at Sherri's online shop,

Happy Crafting!!!