https://lizscreativecorner.blogspot.com/http://lizscreativecorner.blogspot.com.au/p/my-canvases-and-altered-art.htmlhttp://lizscreativecorner.blogspot.com.au/p/my-tutorials.htmlhttp://lizscreativecorner.blogspot.com.au/p/challenges_24.html

Pages

My Lovely Friends,

Saturday, 29 January 2022

Happy Birthday, A Card Made Using The In The Garden Collection From Cleverprints Ltd,

 Hi guys, you could be joining me for the Cleverprints Ltd weekly showcase of our lovely latest collection In The Garden by Jane Royston, which has some totally fabulous stamps, dies and stencils in the collection,

you can catch up with us at any time at Create with cleverprints on FaceBook,

The stamps are so easy to stamp and colour, I have fussy cut my flowers samples here today and they where so easy to do,

I have created a video for the making of this card, which I will link to my youtube channel below, I hope you enjoy watching it, please feel free to leave me a comment or maybe even subscribe to my channel if you wish,


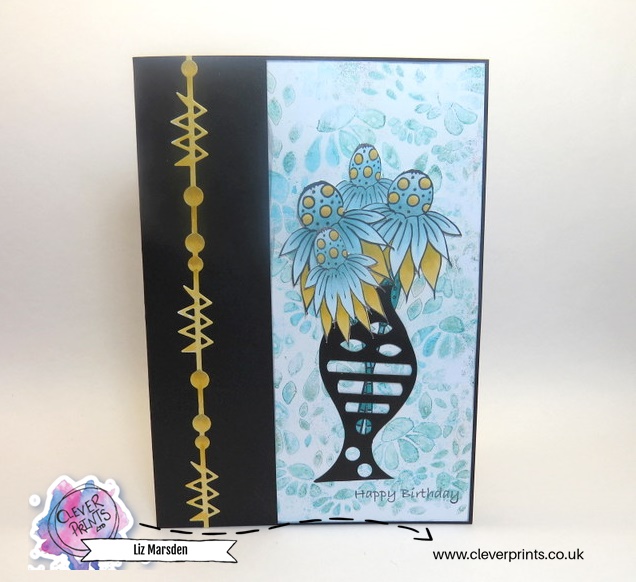
I created the Base of my card using some Black cardstock, on the Right hand side I added a stencilled section I created using the Flower Fall 041 stencil, using my Gelli Plate and Alcohol inks, this is shown in my video too,

The gorgeous flowers are created with the stamps from the A happy Bloom set for the flowers with a stem and the Floral Twist set for the smaller flower heads and Happy Birthday text,

I used the Dies from the Abstract Geometry dies set and they cut out beautifully, Both these dies can be used as a continual design, as I have on the long strip on the left hand side, I trimmed down both edges after cutting the die once for the vase effect,

Use the code  IWTENOFF  before checkout for a fabulous discount,

Do check out all the awesome projects by the design team too,

Here is the Link to my Video,

https://youtu.be/8AFX8KnBU90

Thanks for watching!!

Happy Crafting!!

Friday, 10 December 2021

Oh Christmas Tree....

 Hi guys, I'm back today with another Guest Design Team make for

Decoupage Queen,

This time I've used the fabulous 12" x 12" Scrapbooking papers from the Christmas Collection,


I couldn't resist making an exploding box to show off all the fantastic papers and images from them,


For the lid of the box I used one of the papers as the base, then I fussy cut out the golden wreath image and the Bird, I then layered these up with some 3D foam under the bird, I used some berries from my stash and an odd Sequin or two plus some Chipboard words from my stash to finish it off,


The sides of the lid, have this gorgeous bauble effect paper which I cut down off one of the sheets, then I adhered some string with some bells that jingle when moved,

I also fussy cut out a red bauble off the papers and applied it on the outside front section too,


The box has two layers, the middle layer on the upper side has more of the papers, which I distressed on the edges, here I die cut out a tag shape from another of the papers, then added some Tim Holtz Ideaology metal stars, along with another Sequin,


The front section has this adorable pair of birds, again fussy cut then layered up with 3D foam,


The right hand side section, has some sequins and gold self adhesive effect pearls here and there, to tie in with the paper design,


The back section has this majestic stag from the paper, so again I used one of the metal stars and a sequin to finish it off,


On the reverse of these inner sections, I have used this gorgeous sheet of paper to bring in the red, two are plain and the two sides have an added embellishment,


I have adhered a glassine envelope on each side section for some money to be added as a gift, I then simply fussy cut some more images out to adhere on the fronts,


For the centre section of my box I have created a scene from some wooden houses and a tree from my stash,


Onto these I have added some structure paste here and there for snow effects, I fussy cut the parcel again from one of the papers to finish the scene off,


I added a battery tealight behind the house at the rear, to give some light effects, closing up the sides and back of the box and popping the lid back on allows the glow to be seen a little better,


When it's dark it gives a rosy glow to the scene,

I hope I've inspired you to have a go, the papers and images are stunning and I really enjoyed creating with them,

I wish to thankDecoupage Queen, especially Iveta for the invite and the beautiful papers and Rice papers I received,

Happy Crafting!!

Thursday, 18 November 2021

Believe in the Magic of Christmas

 Hi all, well Christmas is just around the corner, so for one of my projects I decided I'd create another exploding box using some of the fabulous MDF Pieces from

Calico Craft Parts,

So the top has this gorgeous script 

Believe in the Magic of Christmas, in Ancestry Font


All I've done to all the pieces I've used is coat them with white gesso, then when dry add some glitter over the top, the sparkle in real life is beautiful,


On the back section of the box, I used this fabulous Trees scene,


This Child Pulling Christmas Tree on Sled 

 also had some texture paste at the bottom added to give a snow appearance, 


This is one the other side of the box, and features

Snowman and Lamp Post scene

On the front section I added a sled again with the snow effect beneath, this one is a Slatted Sled

For the centre piece I used one of the gorgeous MDF windows,

Gothic Arch Stained Glass Window style 1

I added some white Vellum behind this,


Then added a single Tree in front to create a scene,

Christmas Tree - style 5

then some parcel effects too,


I left enough room behind the window, so I could add a battery tealight, love how this makes the window glow,

Happy Crafting!!

Friday, 12 November 2021

Magical Midsummer Part 1 Video Tutorial

 Hi guys, I have a video tutorial on my youtube channel for

Del Bello's Designs with the first part of how I created this card,


I would love to know what you think of my video if you decide to watch it,

Thank you !!

https://youtu.be/UlRDPZrwm0A

Happy Crafting!!

Saturday, 6 November 2021

Winter Wonderland

 Hi Guys, I thought I'd pop this card on today, 


It would be great for a Mans Christmas card, 


So the card base is 5" x7" with the inner section about a quarter of an inch smaller,

I created the ground snow effect using some torn copy paper and some distress ink in pumice stone, going in small circular motions along the torn edge of the copy paper, I repeated this again to create the effect,

I used a circle mask from my stash, Lavinia stamps has a mask with some cut out for fabulous moon or sun effects, on the moon I created  I used some Neautral Grey Panpastel placed here and there with my finger tip, to give some pattern for the moons surface,the sky is created using circular motions with a soft brush using  Distress Ink

Next I inked up the 092 Pheasant stamp by Lavinia using versafine Claire in Nocturne, on the left hand side,


On the right hand side, I used the 022 Fir tree and the 094 Fir tree stamps, again using the Nocturne ink pad again, I placed them at different heights and places on the card to give a 3D effect,


To finish off my card I watered down some white Gesso and painted it along the fence sections and at the base of the trees, then along some of the tree branches,

I used a fan brush with some watered down white Gesso to flick some paint on the sky area, a little went on the Pheasant too, which I liked,

I used a text stamp from my stash for the sentiment,

 Del Bello's Designs

LAV Fir tree 1 094

Fir tree 022

Pheasant 092

Lavinia Acetate  Moon masks

Lavinia Acetate Hill Masks 

Panpastel - Neautral Grey 

Versafine Claire - Nocturne

Multifarious Card A4

Happy Crafting!!