https://lizscreativecorner.blogspot.com/http://lizscreativecorner.blogspot.com.au/p/my-canvases-and-altered-art.htmlhttp://lizscreativecorner.blogspot.com.au/p/my-tutorials.htmlhttp://lizscreativecorner.blogspot.com.au/p/challenges_24.html

Pages

My Lovely Friends,

Thursday, 5 September 2019

Boogie Nights

It's gone cold and wet here, so to cheer myself up I looked at the moodboard for Lindy's Gang,
the colours are awesome, but me being me didn't see the bright bit of the bright fall challenge, not sure whether the yellow is supposed to be dominant but hey ho I enjoyed making my scene anyway, lol


As per usual it was hard to get a good photo, but here goes, my Skeletons are having a party in the woods!! just chillin out with their friends, lol
I painted the frame first with black Gesso then went over with Lindy's  Magical shakers Bavarian blue and Polk Purple water down with water and painted on, I then added a few tiny Art Stones here and there for a little added texture and went over with some more Magicals,


As you can see I added a few plastic spiders from my stash here and there, I left the glue strings on to look like their starting a web, I took a piece of water colour card and using the Magical Shakers dropped bits around the paper then added some water from a spray bottle over the top, this made the Magicals disperse I also picked up the card for them to run a little too,


The chipboards are by Dusty Attic, I added Finnabair waxes straight on top of the chipboard Skeleton clock face, then glued it in place on the card, I added some metal clock hands by Finnabair which I had lightly added some of the wax too,
My next Layer was a piece of chicken wire which I added on the lower section, onto this I layered some D/A branches, these have a hint of the Magicals on them too,

I hope you can see the D/A Industrial globes I have hung off the tree branch, this I glued into place first, then glued my light bulbs in place simply adding some moss over the top later, it's hard to see but they are at various depths and yes they do hang and swing if moved, lol how funky is their party!!!


My next layer was some D/A Toadstools these were coloured again using the Magicals and also the yellow from a Flat Magical - Purple Paradise,the inner sections of the light bulbs has this on too,
I sat my Skeleton ( do you like my handmade hat?) on a piece of wood with bark, bit hard for his bony bum!!! then added some more moss and a metal leaf embellishment again by Finnabair, and of course more spiders!!!


I used the same type of wood piece, yet more moss and metal leaves around his friend too, when the frame is lifted both of their legs hang down over the frame,


The skeletons had to come from somewhere didn't they? so the coffin lid is stood on the side for later, I painted this first with black gesso, then went over with a Finnabair stencil - Swirly Florals, then when dry I used the Purples and the yellow, a plastic Skull embellishment finishes it off, think this may be from Tim Holtz?


Again more of the Toadstools have been added for depth to the design and interest,


I then added some air dry clay Moons made from a mould set from Finnabair, onto these I added some wax, 


So not sure about the bright part of the moodboard, but I had fun!!! Lol

Lindy's Gang Products


Happy Crafting!!
Monday, 2 September 2019

8th Birthday exploding Box

Hi all it was my granddaughters 8th Birthday last week, so I made her an exploding box using some of the fabulous Chipboards from BlooMar design,


She loves these colours plus glitter so I used some Finnabair waxes straight onto the chippies then added some glitter on the stars over the top,
The Happy Birthday I kept in it's natural colour,
I also made some flowers using Lady E Design dies, the large on is out of Foamiran while the others are made out of card stock,


The papers I used are from Mintay using the Dreamer collection,


She loves opening the exploding boxes to see what's inside, her face was a picture, lol
She loves Dream catchers and BlooMar chipboards have some gorgeous ones so I based the box on a dream theme,


Again the Happy Birthday inside was coloured with the waxes and I added a hint of glitter on the dot of the i, I used fussy cut out flowers from the Mintay papers and a air dry clay moon I made with a Finnabair mould,


I used a larger moon on this square along with some paper flowers and the BlooMar chippie dream,


Of course I just had to add a dream catcher, again coloured the same way including hints of glitter, another paper flower is on this side too,


For the centre section of the box I added a 2D number 8 chippie, which I coloured with the waxes and added glitter to the front section, paper flowers and leaves plus finish it off,

Words set 008
Boho Style collection - Words set - Believe, Hope, Dream, Love
Boho Style  collection - Dream catchers set
2D Number 8 with stars
Frame 002

Flower 001
Flower 004
Leaves 6 Herbs

Happy Crafting

Wednesday, 28 August 2019

Thank You Gift Envelope

Hi guys, have you been having the gorgeous weather? we have and it's been lovely to sit outside a while and not have the rain and cold, lol

Anyway when it was raining and was cold I made this gift envelope using the fabulous Resin
Thank you by Sarah from her the resin embellishment shop, it's part of her online All Day Crafting shop which has some other fabulous items in too,
I left it in it's natural colour this time as it went perfectly with my papers as it is,


I've made my envelope box to hold a bar of chocolate or similar,
The papers are Lemoncraft Grow Old With me collection and the Butterflies and the paper clock are by Lemoncraft as well,

I made some Foamiran flowers out of Lady E Design dies flower 5 and the Roses out of the Flower 6 Poppy dies,


Sorry no chocolate inside, it would melt!!!! or I've already eaten it, you decide!!! lol

Do check out the fantastic resins and other products Sarah sells in her online shop,
She also sells on Facebook,
Happy Crafting!!!

Thursday, 22 August 2019

Wonder Land

Hi guys, I'm here today with my post for the amazing BlooMar Chipboards, these chippies are fabulous and can be left in their natural state or they take paints and mixed media fabulously too,
I created an exploding box with the Alice chipboards sets


I bought these fabulous Alice papers by Stamperia and created the Rabbit hole!! beneath a tree, I had some twigs/branches in my stash so I glued them onto one of the papers with a tree on and added some moss at the top for leaves, below I added  a different type of moss as well to look like roots,
I  fussy cut down one of the smaller Alice images then layered some 3D foam behind her to appear she was falling into the hole, ( I think I'd seen this done somewhere and thought it looked fab so borrowed it, ) I then added one of the texts from a paper in the collection,


As per usual it's a little hard to photograph so I have taken some more individual ones below,


I fussy cut down some of the images from the paper set and used them with some of the fantastic BlooMar chippies, these are in their natural colour, just coloured with a little vintage photo distress ink on the edges,


As you can see I raised the images with 3D foam pads and raised one of the bottles too,


I cut out a door scene and layered a keyhole chippie over the top,


I added a chipboard card in front of two paper ones, again layering them up,


In the middle of my box I added this fabulous rabbit and text chippie, I simply glued this onto a piece of clear acetate to make the rabbit appear to stand up, I added a little more moss near the base as well,

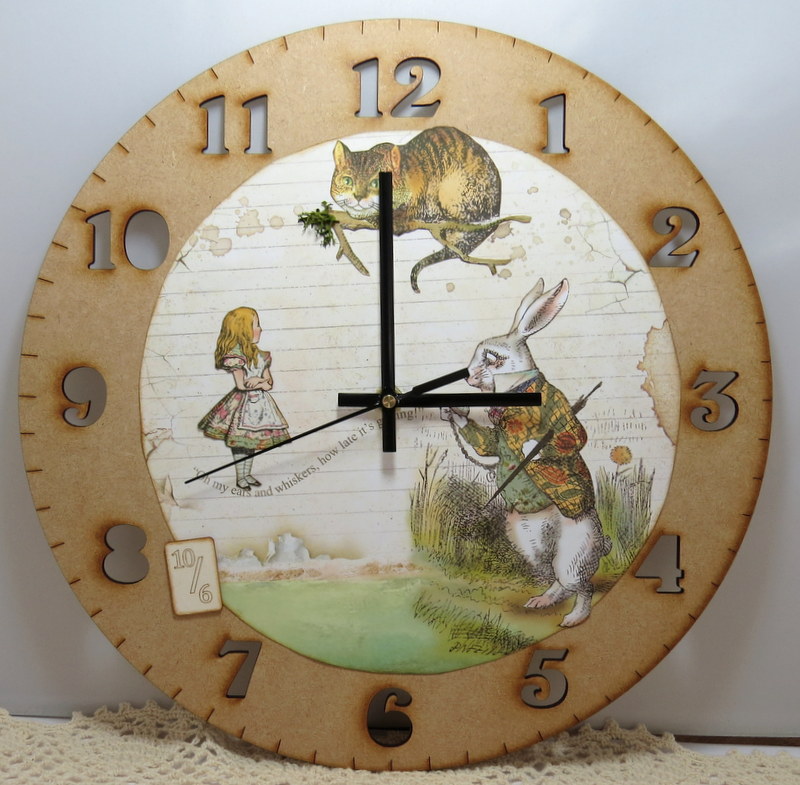
While I was doing this I had a MDF clock in my stash and so used the papers and characters for that too,


To leave room for the hands I simply added another chipboard card to this, which I had simply added some vintage photo distress ink on the edges,


I fussy cut another Alice out and glued her flat onto the paper,


I did the same with the cat and branch and again added a little moss,

BlooMar chipboards


Happy Crafting!!

Monday, 19 August 2019

Another Wedding Day Card

Hi guys, you may have seen that I am currently a guest for Sarah Wright from 
I received some gorgeous resins in my DT kit and this beautiful heart is no exception,


I gave the heart a coat of white Gesso then added a little silver glitter on the top and bottom of the heart too,

This looks lovely in real life as the glitter shimmers subtly, I added a couple of Foamiran flowers around it made with Lady E Design dies  Flower 001 and Tiny leaves,


I cut the leaves out of white card and coloured them slightly with a little ink,


I added a hint of the same Glitter on some of the leaves too,


I created the base of the top layer with another Lady E Design die using one of the Borders,
Beneath this I added one of the fabulous Word sets 009 by BlooMar Design,
The papers are by Mintay which I also got from Sarah,