https://lizscreativecorner.blogspot.com/http://lizscreativecorner.blogspot.com.au/p/my-canvases-and-altered-art.htmlhttp://lizscreativecorner.blogspot.com.au/p/my-tutorials.htmlhttp://lizscreativecorner.blogspot.com.au/p/challenges_24.html

Pages

My Lovely Friends,

Showing posts with label LHOSM. Show all posts

Sunday, 10 December 2017

I'ts Beginning to look alot like Christmas

Hi guys, over at 
Lovely Hanglar or sweet Magnolia when have a new challenge starting which this time is 
Anything goes,

I've made a Christmas scene using some 3D houses, Snowman stamp from the Fall collection and an older Santa by Magnolia then some of the dies from Vol 17,


Hubby cut me a thick piece of hardboard for the base, then I glued together the 3D houses, painted them with white Gesso  and fixed them onto the base,


I used a ladder die from the Magnolia vol 17 club from Swedish House Crafts out of Kraft card stock for the bricks on the houses,
along with some structure paste for the snow effect,
I then added some chipboard brick pieces as the path effect in front of the houses adding some more structure paste and some Art Stones by Prima,

I die cut a baby deer and placed it next to a Snowman stamp from the latest  Fall collection by Magnolia, which I coloured with my distress inks and fussy cut it out, I then made a carrot for his hand out of card stock and a little leaf embellishment from 14 Craft Bar,
I finished the front of here off with another die from the Vol 17 kit,

The middle house was given similar treatment but I added a ladder die from Vol 17 ( this is where the brick detail came from for the houses)


To the taller house I added the same brick effect, structure paste and a charm on the eaves,
in the front of this some more Art stones were added, I made a 3D Christmas tree out of cardstock and added structure paste on the edges as settled snow,


And of course we have to have Santa, he again is coloured with my distress inks then fussy cut out and I sat him onto a cinnamon stick from my stash,
I then made some handmade flowers out of Foamiran from 14 Craft Bar for the other side,


I then finished off the roofs with some cheesecloth and more of my various hand made Foamiran flowers and berries
I then added a couple more Deer dies, and at the back I used a couple of  Christmas Trees with a Gummiapan stamp and die again from Swedish House Crafts,


Now you may have noticed the wire around the tree, well I added some miniature lights to the tree and the back of the houses so it lights up at night,


Closer view of the night time scene,


Well I hope you like my Christmas scene, and  I hope you join us in the fun too over at

Challenges
All About Magnolia - Christmas Time
Magnolia-licious - Anything goes option of Winter
Midweek Magnolia - Anything Goes
Paradise of Magnolia - Anything goes
Simply Magnolia - Winter
Craft Heaven - WinterWonderland

Happy Crafting!!
Hugs Liz xx,

Sunday, 28 May 2017

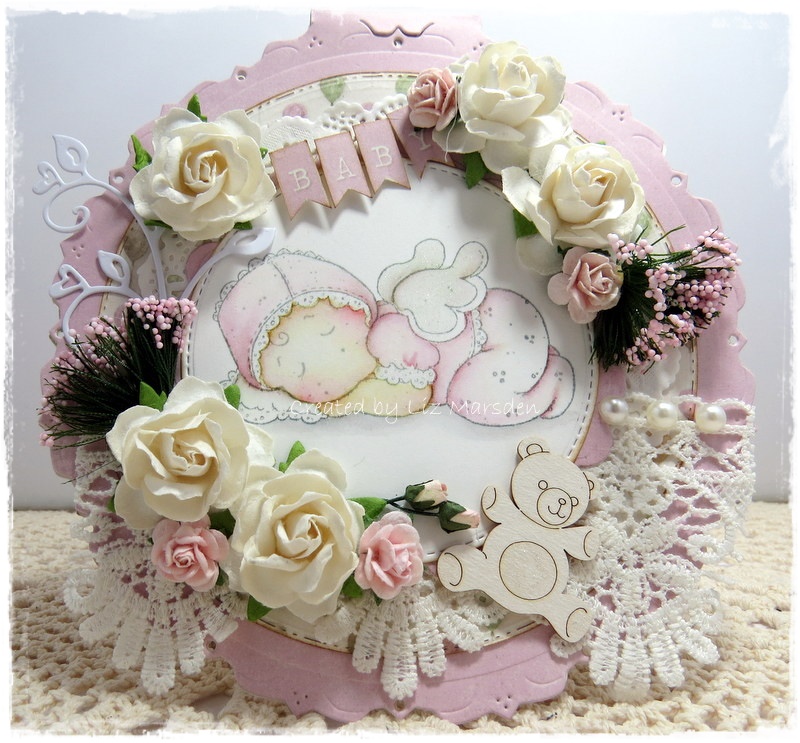
Baby Girl

Hi guys, this is my second post today, this time for the
the theme this month is
 A Special Date
So  New baby, Birthdays, Anniversaries, Christening, Engagement etc,
we are kindly being sponsored by Wild Orchid Crafts,
I chose a new baby using one of the older magnolia's from my stash, an oldie but one of my favourites!!
I coloured her using my distress inks, keeping the colouring soft looking, 
I cut out the  shape using a LDRS die from Tracy at Noor Design UK, using Pion papers from the Theodore and Bella collection and Pion Dusty Rose palette,

I made a banner out of the border strip paper and some flowers from my stash,
Some lace, pearls and a Scrapiniec chipboard teddy bear finish my card off,

I then used this paper for the inside, leaving a space for some text,

Do join us in the fun, we love seeing your creations,
Happy Crafting!!
If you would like to see my earlier post this morning please check it out, lol

Challenges
Magnolia-licious - Anything goes / option Summer
Midweek Magnolias - Dies or chippies
The Ribbon Girl - Anything goes
Marvelous Magnolia - Shabby Chic

Sunday, 29 September 2013

your so charming

Hi guys, I'm just back off my hols so this is on scheduled post,
Our challenge over at Lovely hAnglar or sweet Magnolia this time is to use a charm,
well I've used a few on here lol,

I love this latest tripping flower Tilda and i have coloured her with my distress re-inkers, i've done the background too,
the fab die cut behind the main image is by Noor and I added oriental coins charms on the edges, after embossing the detail and adding a hint of gesso,
I have also used hints of  shabby white frantage too,

we are being sponsored by the fabulous The Ribbon Girl
Thank you Mary,

Items used
Magnolia - tripping flower Tilda
Prima fairy rhymes paper pad @ MCH
Shabby white frantage @ MCH
flower picture - Artsy collage image
Flowers - The Ribbon Girl
Coins/ fan/ stash
Butterflies/ dragonflies / Hobby House
Joy crafts/ square die 6002/0173
Joy Crafts butterfly die - 6002/0251
Joy crafts Floral flourishes - 6003/0002
Joy crafts Floral Flourishes - 60030003
gesso
distress inks

Sunday, 1 September 2013

Pretty in pink

Hi guys back again today with my post for 
which this fortnights  challenge is pretty in pink,

I've had a change and used one of my large scalloped circle and circle grand spellbinders dies to make the base card shape,
the gorgeous baby stamp is by Magnolia and is coloured with distress re-inkers and the wings have glamour dust on,
closer view of Sleeping baby Tilda

items used
Magnolia - sleeping baby Tilda
 Melissa Frances -Cest la vie paper pad @ MCH
Flowers - The Ribbon Girl
 Martha Stewart - Square mould
 Martha Stewart - Clay
Ribbon, lace, feather, cheese cloth- stash
We are being sponsored by the fabby 

Thank you Mary
You, Me and Magnolia - anything goes
hope you'll join us with your pretty in pink creations,
Happy Crafting,
hugs Liz xx

Sunday, 9 June 2013

Second post today, Enjoy the little things

I'm back with my second post of today for Lovely Hanglar or sweet Magnolia only challenge,
this time the challenge is
 lace and pearls,
and we are kindly being sponsored by the fabby,The Ribbon Girl,
I've coloured Tilda with Tulip pot  in copics and I've used frantage on the edges too, the background I did using copics then used a piece of towelling with a little blender ink on to put a pattern on,


closer view ,

Recipe
Magnolia - Tilda with Tulip Pot
Melissa Frances Attic Treasures ivory pearls @ MCH
Aged Ivory frantage
Prima lifetime paper pad @ MCH
Pale pink lily flowers @ the ribbon girl
Butterfly - cheery lynn die,
Dried flowers - Anna Marie designs
doily / stash

copics
skin -E000, E00, E11, R20, R11
Hair - E51, E53, E55, E13
Top - E51, E53, E55,
Dungarees/ shoes - W0, W1, W3, W5, W7
Pot - E35, E33, E31, E50
Leaves - YG63, G94, G21, YG03
Pink - R81, R83, R85

Challenges

Hugs Liz xx