https://lizscreativecorner.blogspot.com/http://lizscreativecorner.blogspot.com.au/p/my-canvases-and-altered-art.htmlhttp://lizscreativecorner.blogspot.com.au/p/my-tutorials.htmlhttp://lizscreativecorner.blogspot.com.au/p/challenges_24.html

Pages

My Lovely Friends,

Tuesday, 27 October 2020

Colour share card

 Hi I saw on Facebook on Amazing Paper Grace a colour share where you can create a card using three of the colours off the photo, so I thought I'd have a go, lol


I chose the red, green and the taupe colour, then teemed it with gold, don't know if that's allowed but it's what I've done lol,

I've used lots of APG dies for this card, which I will list below,

I made some card stock Poinsettia flowers and simply added a little modelling paste here and there to give a snow effect, I die cut the Joy words twice simply gluing the red in the spaces between the Gold, it's a bit fiddly but looks fab!! lol 


Inside are two pages with more of the dies, using the same colours just in different layers, again I added a little modelling paste, the designer paper has gold effect on it, but I decided I wanted more to the card so I used one of the shadow box dies to create....


An outdoor scene, with a house made up on the other side  with some of the Charming  Cottage Box dies, I added some snowflakes from the Grand Christmas Lattice Arch too,


As you can see it is closed with a piece of ribbon,

APG dies used:

Holly Frame Gala

Elegant Twist Rectangles

Cinch and Go IV

three quarter border frame- shadow box dies Grand Christmas Lattice Arch

Charming Cottage Box

Picot Petite Ovals

Holiday Word Blocks

Cinch and Go Poinsettia

Happy Crafting!!


Monday, 26 October 2020

Exciting news!!

 Just popping by to share my awesome news,

I am part of the fabulous LG Crafts Ltd design team, for

That's Crafty online shop,

I'm so excited and honoured to be part of this awesome design team, 

Happy Crafting!!

Wednesday, 21 October 2020

Seahorse Wonder

 Hi everyone,

Today I thought I'd show you how I decorated a MDF Seahorse I have in my stash, using mixed media I got from The Mad Scrapper


I love Seahorses and used stencils, paints, metal embellishments and Dusty Attic chipboard to add textures and interest to the main shape,


I started off with some Finnabair modelling paste stencilled through a Finnabair Ornate Lace Stencil, I love how it accentuated the eye,

when dry I added all the embellishments, I added cut down pieces of the D/A fish net panel, with some other metal pieces from my stash,


I used D/A Coral#1 and Coral#2 for middle section along with some Finnabair Mechanicals Steampunk Gears,


On the tail section I used some D/A Seaweed and more metal embellishments, all the embellishments I fixed onto the base with Finnabair heavy Body Gel,

When dry I painted over with Finnabair Impasto Acrylic paint in Jade and Azure randomly over the Seahorse, I went over again in some areas to create depth and variety of the colours, then I used some Patina effect pastes in Blue and Mint green,


Again when dry I went over here and there with some Finnabair waxes in Old Denim and Mint Sparkle,  and a light dabbing of white gesso here and there over the top too, it's a shame as the photo's on here don't show how fab it looks,

The mad Scrapper

Finnabair:

Heavy White Gesso

Heavy Body gel

Impasto Acrylic Paint Azure

Impasto Acrylic Paint Jade

Ornate Lace Stencil

Modelling Paste

Patina Effect Paste - Blue

Patina Effect Paste - Mint green

Mechanicals - Steampunk Gears

Wax - Mint Sparkle 

Wax - Old Denim

.......................................

Dusty Attic:

Coral#1

Coral#2

Seaweed #1

Happy Crafting!!

Saturday, 17 October 2020

Last bit of Halloween fun

 Hi all, I've created a few Halloween themed projects this year, this is my latest and probably my last, for this year lol


I couldn't resist using the Elegant Twist Rectangles dies Amazing paper Grace by Becca Feeken from Spellbinders, they cut a dream, I found this piece of designer paper in my stash and couldn't resist using it for the lid, simply adding some APG die bats from the Spooky Cottage die set,


Opening up the exploding box I created a Halloween scene inside using more of the Spooky Cottage die set and some handmade Air Dry clay pumpkins, from a tutorial I saw of Emelia, such fun to do,


I die cut a few of the scary tree die and simply scored roughly in the centre of each piece, folded them then stuck the pieces together to form a tree, I love how you can make a flat die into 3D,

I finished off the scene with a little moss from my stash,

I shall be back soon with another Sea Life project then

  I'm starting on Christmas projects next I think,

Happy Crafting!!

Wednesday, 14 October 2020

Wonders Of The Sea

 Hi, I'm here today with a project which I've loved creating,

I saw the fabulous Mood Board on The Dusty Attic website and just had to use it as my inspiration,


I love under the sea projects and Seahorses are one of my favourites, so I've used a few Finnabair mixed media and  Dusty Attic chipboards products on a reverse canvas frame,

 I took an Cobblestone stencil and some modelling paste and stencilled the lower outer frame to give a little texture, let this dry,


I then  painted the reverse of the canvas frame with some different colours of Finnabair blue and green acrylic paints, these I watered down in places with a lot of water on my brush to give variations of colour too,  and set aside to let this dry,

I took this adorable Dusty Attic Sea Horse and added some mechanicals Steampunk Gears along with some Dusty Attic corals cut down then a few metal embellishments from my stash, I glued these on with some Finnabair Heavy Body Gel, then I left these to dry,


When they had set I got some of the fabulous Patina effect pastes using the blue and Green colours and added the colour by stippling it on with a brush, I went over with the colours in places for added depth then later I went over parts with some waxes in Old Denim and Mint Sparkle,


I built up some layers for the underwater scene by adding some cloth type fabric I have in my stash which I painted with two colours of Dusty Attic acrylic paints in Pesto and Forrest, (you can see this behind the seahorses head), then built up layers of  Dusty Attic Corals, these I painted with Heavy White Gesso first then when wet added some mini Art Stones over the top, then when dry I painted over with the D/A paints,

I added some Air Dry Clay Stars from a Finnabair Mould but shaped them before drying to look more starfish in shape ( hopefully), these I painted with some of the Patina paste then went over with the Old Denim Wax,


On the other side I did similar but first I added a cut down section of D/A  Fish Net Panel, this I added the  pastes too, again I added some of the Coral with some more of the starfish!! when dry I glued some seashells and moss from my stash,


After fixing the Seahorse in place I added some 49 and Market Wishing Bubbles in Minty Breeze in a couple of places to give an added bit of interest,


Finnabair;

Heavy Body Gel

Impasto acrylic - Azure

Impasto acrylic -Mediterranean

Impasto acrylic - Jade

Patina Effect Paste - Blue

Patina Effect Paste - Mint green

Heavy body White Gesso

Stone Effect Pastes - Pumice 

Wax- Old Denim

Wax - Mint Sparkle

Stars and Moon Mould

Cobblestone Stencil

Mini Art Stones

Modelling Paste

 Mechanicals Steam Punk Gears


Dusty Attic:

Seahorse #1

Coral #1

Coral #2

Seaweed #1

Fish Net Panel

Acrylic - Forrest 

Acrylic - Pesto

49 And Market - Wishing bubbles / Minty Breeze

Dusty Attic Moodboard


Happy Crafting!!


Thursday, 8 October 2020

Cards with paper flowers plus link to youtube tutorial

 Hi guys, I thought I'd show you some cards I've created using some paper flowers I've made with the Amazing Paper Grace Cinch and Go V dies from Spellbinders by Beca Feeken,


I created the cards with some more APG dies Elegant Twist Rectangles and Bed of lace dies,


I've created a youtube tutorial on how I made these different looking flowers from the same Cinch and Go V dies,


I added Micro beads in the centres, and added some self adhesive pearls on the Bed of Lace die behind the flowers,


Happy Crafting!!

Saturday, 3 October 2020

The Midnight Hour - Enter If You Dare

 Hi guys, I'm back today for 

The Mad Scrapper 

As you know we don't overly do a lot for Halloween in the UK, but my Granddaughter loves to dress up and I usually make Halloween themed projects for her, this is my latest!


You can't make out much detail so I took it in the daylight too,

Of course it doesn't look all that creepy in the daylight, but I wanted you to see the fabulous products used to make it which Janine sells in her store, I've used loads of Dusty Attic chipboards for this project, though do check out all the other fabulous products Janine has instore too


First of all I used the largest Skeleton Clock face by Dusty Attic, this I painted with some Finnabair  Black Gesso then when dry I went over with Finnabair -liquid Acylic in Carmine, as always links below!


This allowed some of the black to appear through here and there,

I then cut out a circle for the middle using watercolour cardstock, this I painted with some Lindy's Magicals from my stash, Janine sells some of Lindy's products so take a look, I then cut out some strips of the watercolour card and painted them with texture paste by Finnabair, when dry I went over with some more of the Heavy Black Gesso,


I took the fabulous Haunted House by Dusty Attic and painted it with Finnabair Sparks Acrylic Paint in Raven Black, this I added using some 3D glue so it stands slightly raised off the base, underneath I coloured some Cheesecloth with the Black Gesso, then when dry glued it under and to the right of the House, on top of this I added some of the D/A Tombstones simply coloured with the Gesso, these I adhered on flat to continue a layered theme,

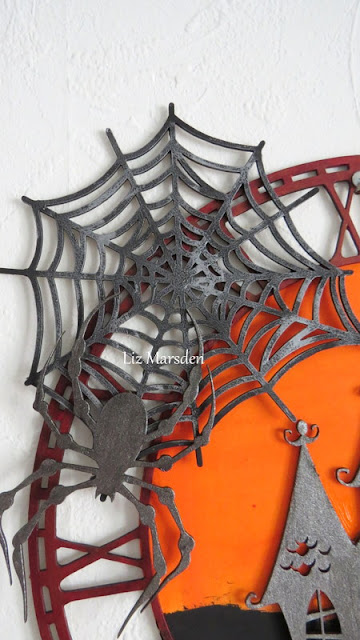
I added a Spider web#2 on the left which I painted with black Gesso then went over the top here and there with Finnabair wax in Brushed Iron, the spider again was painted first with Black Gesso then I went over with Finnabair Sparks Acrylic paint in Raven Black, this gives a slight sheen look to it,


I painted some of the Dead Trees#2 using the Black Gesso and again added some of the wax here and there over the top, I adhered on flat and the other raised so it could go on the outer section of the clock, I then used a stars and moons mould by Finnabair with some Air Dry Clay,


Again to give the clock a little interest I used one of the Scaredy Cats just painted with the Black Gesso,

As you may have noticed I added some fishing wire before I stuck the House down onto which I added a creepy crawly Spider


This again is painted with the Sparks Paint,


Products used from The Mad Scrapper
Dusty Attic:

Finnabair:

Janine has other Halloween themed products in store too, or if your not into Halloween check out all the other fantastic products she sells,

Happy Crafting!!

Friday, 2 October 2020

It's Pumpkin Time

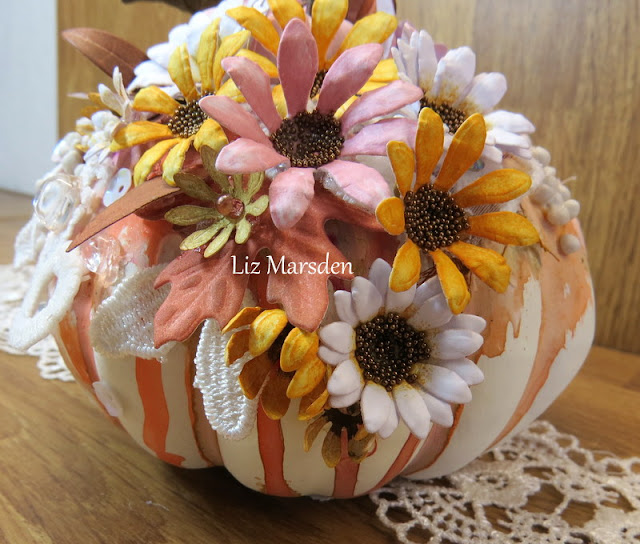
 I love this time of year and love decorating and making Pumpkins, this time I took a ready made pumpkin from my stash and decorated it with some of my handmade Clay pumpkins from a fabulous tutorial by Emelia, and paper flowers using the Amazing Paper Grace Cinch and Go V dies,


I created a few different looking flowers out of the Cinch and Go V dies, some double layered, some single, and some semi closed cupped, 

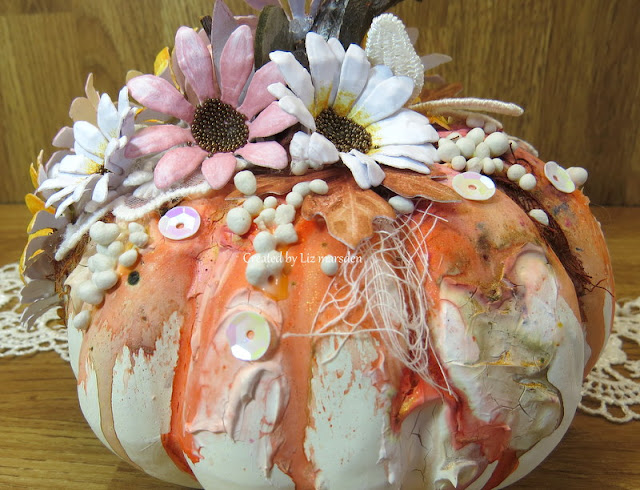
I painted my base Pumpkin with some Lindy's Gang shakers simply adding some water to create runs down the Pumpkin, it look fab at the top too but of course it's covered up!!! duh,

I added some crackle paste, cheesecloth, lace on the base first, then added my flowers and leaves,


I coloured the paper flowers with distress ink and a versa Magic ink pad, then added Micro beads in bronze or gems in the centres, 


As you can see the white daisy like flowers are the two layered ones,


Above you can see where I've cupped them more to appear as though they've yet to open, the smaller leaves came with the dies set, these I coloured with a few colours of distress inks, the other leaves are from a die in my stash,


I glued on some Art Stones and sequins here and there too,


Can you see my Air dry Clay Pumpkins, they are there honest but hiding, my next project has them more visible!!! lol


I finished off my Pumpkin with some Melange Art Pebbles by Finnabair, these came from

The Mad Scrapper as does most of my mixed Media products, 

Oh well all for now, see you soon,