https://lizscreativecorner.blogspot.com/http://lizscreativecorner.blogspot.com.au/p/my-canvases-and-altered-art.htmlhttp://lizscreativecorner.blogspot.com.au/p/my-tutorials.htmlhttp://lizscreativecorner.blogspot.com.au/p/challenges_24.html

Pages

My Lovely Friends,

Friday, 30 October 2015

GDT for Noor Design UK

I'm here today with my first project as guest designer for Noor Design UK, the lovely Tracy asked me if I fancied being a guest and of course I said yes, as some of you know I Love the stuff Tracy has in her shop,

I used one of the gorgeous MDF leaves as my base then stenciled through the -
 010 mask art flower swirl with grunge paste, I left parts of it choppy as I think at this time of year nature is a little grungy and that's how I like it!! lol,
When the paste was dry I sprayed a few Prima colour bloom sprays on it, Tracy has some of these in her store and I love these too, antique gold, Gold foil and Gilded
I took some of my favourite soft board bricks - 014 and added a couple of colours of distress ink to them then adhered these to the leaf, slightly to one side and higher then the centre, these are peeking out at the top behind the craft paper art leaves - 008
I also coloured some of the - 027 paper art leaves with my distress inks and slightly shaped them by hand to give depth,

I finished off my leaf with some orange flowers from Sweet Lilac and the large gorgeous flower sent by Tracy, I also added another three soft board bricks under the flower display to finish off,
I think I may give this to my mum, as she adores Autumn and loves these colours,
Check out Tracy's fabulous store for more gorgeous products and her blog for some fantastic ideas from the talented girls,
Back next Friday with my next  Noor Design project,
Challenges
Fussy and fancy - flowers


Tuesday, 27 October 2015

The Haunting

Hi guys over at 
we have a take your pick theme again, so
Colour - Halloween Hues
Technique - Decoupage, toppers, or existing stamps
Product - Score boards, glitter girls, houghie, etc
 and we are being sponsored by the fabby Simon says stamp

I went for the halloween hues, last one I promise, lol
I got the hat template from my Silhouette but made it smaller, then after making it up decorated it with a plastic skeleton I got from Asda, it was a string of them so you will see more next year!!!! he he

The fabby spooky tree, spider, and Bat are all from Tando Creative, painted with Deco Art fluid paints,

closer view,

I found a peel off web in my stash, had it years and finally found a use for it, I added the moss at the bottom as I thought it kinda looked a little dead too,

I placed the bat on a strip of acetate so he can fly!!
Flowers from Sweet lilac finish it off too,

so yet another Halloween project for a household which doesn't really do Halloween, oh well Tegan will enjoy it Hopefully!! lol

Challenges
Fussy and fancy - Colour challenge /orange/black/ purple
Southern chipboard - Halloween

Sunday, 25 October 2015

Magnolia Only at The Ribbon Girl

Hi guys, it's time again for the Magnolia only challenge over at 
the theme is anything goes but you must use either a Magnolia image or Doo Hickey die cut,

I thought I'd better do a Christmas card as the big day is coming and I've a few to do, lol
I coloured Tilda from the new collection with my distress re-nkers, isn't she adorable, love her little snowman,
the papers are from Maja Design as is the banner which i cut off one of the paper bottoms,
all the gorgeous embellishments are of course from the ribbon girl listed here,


Challenges
Bunny Zoes - Shabby chic Christmas
Craft Heaven shop challenge - Lace and flowers
Live and love crafts - pink
Magnolia Mania - lace and pearls
Time for Magnolia - Ribbon and or lace
Lovely Hanglar or sweet magnolia only - anything goes
Do join us in the fun, for your chance to win a lovely prize,

Thursday, 22 October 2015

Halloween- book of the dead

Hi guys, I'm back today with my project for Tando Creative,
the theme this week is Spookilicious,

I started off with a paper mache book from my stash, which i covered with torn scrunched up tissue pieces,old wrapping, then gave it a coat of black Gesso to harden the tissue, I then applied Inka Gold waxes here and there, 
I used one of the skeletons from the skeleton pair and painted it with white Gesso then when dry added a hint of pumice stone distress ink, doesn't show on here though,
I finished off the front with some die cut hinges and a latch chipboard piece from T/C which i covered with Deco Art carbon black fluid paint,

The side was finished off the same way and I added a couple of charms and a Tim Holtz skull,


On the inside right of my book I first created a scene using water colour paper, onto which I stamped a moon, this i cut out and added vellum behind,  I also used a tree die cut too, then I  took a Rickety house die, cut it out with corrugated card and painted it with Deco Art Paynes grey fluid paint,
The awesome T/C chipboard witch is coloured with my distress markers and i used some texture sand first on the broom handle and some modeling paste on the broom twigs for depth and texture,
In front are some of the mixed mini Halloween items, the skull is painted with white Gesso as before then shaped lightly by hand, the pumpkins were first painted with distress ink then given a couple of coats of ultra thick embossing crystals and heat set,

The left hand side of the book is finished off with a verse off the internet, another T/H skull and a couple of die cut cobwebs by la la land crafts,

but I thought it needed something more so!!!!


I added some crystal stars and a string of lights,

what do you think? spooky enough!!! lol
Remember you can join us in any of the themes in the month by linking at the top of the page for a chance to win some Tando Creative goodies,

Challenges
The mixed media challenge - word search/ witch, purple, black, skull, pumpkins,Our Players Badge for Your Blog

Altered Electics, - Anything goes, - recycled tissue paper
Country view crafts - Add some texture

Tuesday, 20 October 2015

Book shaped card

Hi guys, back today for the paper Take Weekly challenge
which is All About the Base, 
No squares, anything but square card bases

I cut some book shape pages using a design off the Silhouette, I made them larger though,  then I cut them out of Maja Design papers,
The stamp is by Magnolia coloured with my distress markers and I also used a stempleglede postal type stamp too,

The flowers are from Sweet lilac, leaves from my stash, all the other embellies are from The Ribbon Girl
 Top stitch thread,

Craft Heaven shop challenge - Lace and flowers
Magnolia mania - lace and pearls
Midweek Magnolia's - CAS or overload
Marvelous magnolia's - no fall colours

Monday, 19 October 2015

Halloween Night

Hi guys, I'm back again with another project for Halloween, I know we don't even do much for it in our house but i get the crafting bug every year!!! for it,
I hope you can enough of the detail as i can't re take my pictures as I sent it to Tando Creative for display,

I made a canvas using some of the fabulous products from Tando Creative again,
I started by using the moon shape on the witch mask, then i sprayed shimmer misters by Deco Art in turqouise, white, purple and carbon black, I then removed the mask and while the purple was still wet smooshed some of it over the moon,
I cut around the witch from the witch mask onto water colour paper and coloured it in using distress markers,I then used  a few strands of mulberry bark coloured with carbon black mister for her cape,

The house is a die cut out of corrugated card board and painted with Deco Art paynes Grey acrylic fluid paint, then i added some vellum behind the windows, the tree is from the graveyard sets and is coloured again with the paynes grey and then i outlined some of the tree with Black aqua glass relief out liner, not showing up on here, sorry!! i did the web on the tree using Deco Art silver fluid paint,
But basically gives the effect as for the bat veins, i also used some pearls for it's eyes, this was coloured with some carbon black fluid paint,
At the side of the house you can just make out the graveyard set, which i painted by pouncing white gesso on first then when dry doing the same with Paynes grey fluid paint with a foam sponge, this gives a fab effect,
The skull is from the mini mixed Halloween set and is painted with white gesso and slightly shaped by hand, the pumpkin is coloured with is coloured with Quinacridone burnt orange as is the owl in the tree,
The spider is from the spiders grab bag and is coloured the same way as the tombstones,
I used a couple of black roses from Sweet lilac at the bottom left too, and used my hot glue gun to make a spider web, eerie mess too, lol
A few crystal stars which I've had forever in my stash came in handy too,
I will be back soon with yet another spooky creation too!!!!

Altered Electics - Anything goes
Country view - Add some Texture
Fussy and Fancy - orange, black or purple

Saturday, 17 October 2015

Relax, Take it Easy!!!

Hi guys, I felt like having a play, just for fun, and yep Halloween came to mind!!!
I used two of my older collection Tilda's and painted them with my distress re-inkers, fussy cut them out and then placed them using 3D glue,

I first started with a piece of chipboard from Tando Creative, which I cut down, then after painting one of the graveyard sets tombstones with distress ink pads I fixed it to the back edge, first bending up the lower section so the stones were upright,
I cut a coffin from a template on  my Silhouette and added a Tando Creative Skeleton which I first painted with white Gesso, then added a little shade with pumice stone distress ink, at the hip line on the skeleton I bent it so it would sit in the coffin and raised one of the arms too,
The scary tree behind is also from the Graveyard sets and this is painted with carbon black paint for the tree, and silver for the web,

I added some Mulberry bark for a hint of cobweb in the coffin too, I used Finland Moss around the scene and added some pumpkins,toadstools and a spider from my stash,
The skull on the tombstone is by Tim Holtz, the larger one at the front is another chipboard one from Tando Creative,

The fence die is by Memory Box,

Challenges
Dies R us - Ghoul friends
Magnolia-licious - Spooktacular fun
Paradise of stamps - Halloween or fall
Time for Magnolia - Autumn/ Fall colours
Marvelous Magnolia - Add some Black

Will be back with more Halloween stuff soon too,


Thursday, 15 October 2015

The Witching Hour

Hi guys, Our challenge today over at
Orange and Black,


I started off with a Tando Creative chipboard clock which i added texture sand on the top, then when dry sprayed it with Deco Art misters in Carbon black, purple and yellow/green, again from Tando creative,
I used a metal disc from hubbies stash, no idea what it is used for!! but on here I stamped a clock face onto it, then on the paper background too,
I then used a cog again from Tando Creative, done the same way as the clock frame with some T/C clock hands on top then a small skull by Tim Holtz, some clock workings finish that bit off,

The witch is again from Tando Creative which i painted with my distress markers then added some mulberry bark for her cape, the broom and hat had some texture sand and  paste added for some depth and texture effects too,

I added some gorgeous orange and black roses and fab leaves from Sweet Lilac plus a pumpkin from my stash, 


The skull was cut from the same sheet of designer paper, the Tando Creative  pumpkins were given a layer of ultra thick embossing powder on the top then heat set, I painted the spider web with silver metallic paint then when dry dabbed some of the Carbon Black over the top, The T/C  bat from the mini mixed Halloween set was painted with carbon black paint, then when dry I added some aqua glass relief  glass outliner for the veins,

If you have any Sweet lilac flowers, why not join us in the fun for a chance to win some more,

Challenges
Altered Electics - Anything goes
Country view crafts - Add some texture
The Artistic stamper - Clocks
The mixed media monthly challenge - word search( bat/ purple/pumpkins/skull/witch/black/orange
Our Players Badge for Your Blog

Tuesday, 13 October 2015

Two by Two

Hi guys, over at Paper Take Weekly  our theme this week is
Two by two, so 
please use 2 images, 2 papers or 2 different types of embellishments,
we are being kindly sponsored by The Hobby House,
(sorry just noticed a stray thread/hair on the photo, don't know where that came from) but it's not there now,  lol,

I've used the Magnolia house dies and one of the latest Tildas from the new collection, all painted with my distress re-inkers, then fussy cut out,
papers are by maja Design,
I used Snow Tex for the snow effect on the roof etc, so love this stuff and added small pearl dots with liquid pearl for falling snow too,
The trees on the right are from a Sissix die then again I've used Snow Tex on them, the left one is a Lal La Land die and after the Snow Tex treatment I wrung some Silver Twine round it and added some gorgeous coloured pearls ,
Peeking out from  the sides is some new Silver flake ribbon all these are from The Ribbon Girl, listed below,

TRG
Flat back Ivory pearl trim

Challenges
Let's craft and create - Ribbon or twine
Christmas stampin all year long - Fav Christmas combination and or lots of layers
Winter Wonderland - Christmas flowers

Thursday, 8 October 2015

I'm Nuts about you

Hi guys, I'm back today with a DT project for Tando Creative,
This week it's a colour challenge with autumnal  colours so I couldn't resist using this fabulous
squirrel and woodland set,

I started off with a Tando Creative 6x6 piece of board which i covered with scrunched tissue, I then used a tree die from my stash cutting it out of water colour paper and stuck it onto the middle of the design, I then sprayed the back with Prima Bloom sprays, 
I used Deco Art media texture sand  paste on the squirrels bodies, stippling the body with an old stipple brush and the tails have a thicker layer of Modeling paste on, which I ran a knife along to give the tail effect, when dry I painted the bodies in Burnt Umber then when dry a lighter mix of the Burnt Umber (a little water added) and Burnt Sienna with Titan Buff mixed for the tail,
The acorns have a hint of stippled texture sand paste on the caps, then when dry I coloured them with Burnt Umber,
The leaves and acorn bottoms were painted with yellow oxide and quinacridone burnt orange mixed,
Mushrooms have fluid inks Titan Buff and yellow oxide on them then a layer of liquid applique for the spots, the only other thing I've added are a few leaf die cuts again coloured with the inks,

The colour theme,

Tando Creative items used:
Deco Art -

Do come and join us in the fun, for the chance to win some awesome Tando Creative goodies,

Tuesday, 6 October 2015

Halloween

Hi guys, over at 
Paper Take Weekly we have a new challenge for you
Anything goes with optional extra
Make a Halloween treat holder,

Well I've made something for Halloween but not exactly a treat holder, 
my excuse, I'm only just back from my hols and my mojo has gone for a very long walk !!!!
but thankfully I had made this before my hols, lol

The chipboard Halloween is by Tando Creative, which i have added some texture paste too, quite thickly, stippling some, then also using my knife made I  some lines in before it set, when dry i sprayed it with some Deco art spray misters in yellow/green, purple and carbon black

For the Tando Creative pumpkin I used spiced marmalade distress ink then embossed it with ulta thick clear embossing powder, then heat set it
The bats is are coloured with carbon black acrylic fluid paint and when set I added some Aqua Glass relief paint for the veins, and some pearls for the eyes,
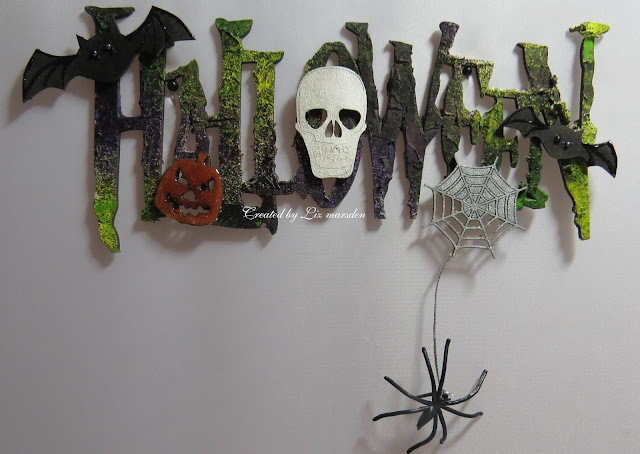
The skull was painted with a white mister then shaped slightly by hand to add dimension,

The cobweb is painted with Deco Art silver fluid acrylic paint and i hung a spider from my stash below it too,

Deco Art Fluid Acrylics

Challenges
Altered Electics - anything goes
Country view crafts - Add some texture
Crafty Calender - Halloween
Our Creative Corner - Halloween Horror
Simon says stamp Monday challenge - Autumn is in the Air