https://lizscreativecorner.blogspot.com/http://lizscreativecorner.blogspot.com.au/p/my-canvases-and-altered-art.htmlhttp://lizscreativecorner.blogspot.com.au/p/my-tutorials.htmlhttp://lizscreativecorner.blogspot.com.au/p/challenges_24.html

Pages

My Lovely Friends,

Friday, 21 September 2018

Foamiran poinsettias

Hi guys, I've been having a play with the latest Poinsettia die by Lady E Designs, I've made them a couple of different ways just to show you and depending on the look you want too,


I made all three out of 0.6 Foamiran in white, from 14 Craft Bar, which I coloured with a  Versa Colour ink pad in 64 Khaki,


I coloured all the petals on this one with the ink pad keeping the petals fairly flat only slightly cupping the middle a little in the middle of each petal, for both of these Poinsettias I only used two layers of the largest  flower die,


I made this one the same way but I only coloured the centres with the same ink pad, I then used some Kraft coloured cardstock for the flower centres, this I sprayed lightly with a little water and slightly shaped the outer upwards and  towards the middle,


This one I did with three layers again using the largest Poinsettia die and the flower centre, after colouring all the petals I then heated each petal at a time on the iron for a second or two then immediately placed it on a foam pad and pressed down in the middle of the petal with a ball tool, this makes a more cupped shape and it tends to stay raised as you've used the heat, again I used the flower middle then I simply added a pearl centre in all the flower which again came form 14 Craft Bar, 

Hope you can see the difference, Lol
Hugs Liz xx


Wednesday, 19 September 2018

Merry Christmas

Hi guys, I've another Christmas card to show you today made for the
My Besties Shabby Chic design team,


I used this adorable Img from the latest Sept Release

She's coloured with my copics and distress with some distress ink on the edges, I also distressed the edges of the papers with my distress tool,


I added a little Glamour Dust onto the image too for a little sparkle, I finished my card off with a handmade foamiran flower made with one of the new Flower dies  004 by lady E and her new Tiny leaves Die too,
Check this out and all the other gorgeous images by Sherri,
Happy Crafting!!!!

Thursday, 13 September 2018

Autumn Birthday

Hi guys, it's my Brother in Laws Birthday soon and I was at a loss what to make, then I saw the Dusty Attic Mood Board for September which was perfect!!! lol
He loves the outdoors and nature and the mood board along with the colours was fab for what I had in my stash and what he loves, 


I started off with some corrugated card which I used on the base of my card, simply adding some paper by Lemoncraft over the top which I had distressed on the edges and tore back in a couple of places,
I've had this stamp for a while and it fit in perfectly for the theme and the colours of the mood board too,


Over the top of the image I coloured some Dusty Attic Lavender in some crackle paste then when dry I went over with some acrylic paint, I then highlighted this here and there with a little distress ink,


To keep in with the natural theme again I used some burlap fabric and cut out a couple of simple flower shapes, then added a few of the fibres from the burlap too, I finished it off with a metal embellishment,


On the mood board was some twigs and a bird so I die cut some twigs and used one of the fab D/A chip board birds which I again added some crackle paste too then coloured with some acrylic paint,


Some more twigs and leaves which I glued in front of a mini fence by Dusty Attic which all were on the mood board as well,


Then for another bit of added interest I used some Dusty Atic mini chicken wire coloured the same way with acrylic paint then I added some bronze micro beads here and there too,


September 2018 Mood Board
Here is the fabulous Mood Board, so I used:
Colours, twigs, leaves, outdoors, bird, cloth/fibres, Fence,


Check it out here at
http://dustyatticblog.blogspot.com/
Challenges:
 Dusty Attic - September Mood board 
Happy Crafting!!!

Tuesday, 11 September 2018

Joyous Winterdays

Hi all, today I thought I'd show you a tag I've made for the Winter/ Christmas season because "yes folks it's coming", for Swedish House Crafts, there's still a sale on in the online shop so check it out if you've not already done so, more details below

 we've had a few cool days already and I am so not ready for Winter clothes etc!!! Lol


I made the base for my tag/card out of the fabulous large Gummiapan tag die, I love it, it cuts a dream even through thick card or as here one thick card folded in two to make the shape of a card, you could of course use it for a tag, I love it when you can use a die for more then one thing, he he
I used some of my favourite papers by Maja Design from the Joyous Winterdays collection, (list below) after cutting out both papers with the tag die I then cut the shape I wanted with my scissors then distressed the edges with a distress tool, as you know I love the shabby Chic look,
I added a Gummiapan Stockholm stamp on the top corner a couple of times to add a little added interest,

I took the Gummiapan snowflake die and cut it out a three times in the same card stock as my base then added some frantage over the top and heat set it, when dry I glued these behind my top layer of paper,


I wanted my top layer to be raised up more so I added some foam pads behind before fixing on to the top of the base layer, at this stage I went over the tag edges with some vintage photo distress ink,
 I then used some Twine from my stash, I fixed some of the beaded berries on one side of the twine too, 


I just adore this adorable snowman die again by Gummiapan I cut out him out twice again out of the same card as the base, then coloured and fussy cut the hat before I glued it on top of the other one,
I added some ric rac from my stash for a tiny scarf, isn't he cute!!!! 


On the right hand side I added another die ( From farm to market - market fence)  this time made by Magnolia, it's a perfect size to go with the tag and the Snowman, in front of the fence I used the same snowflake die but this time out of some Maja Design paper which looks more like foliage, I then added some liquid applique here and there for a snowy effect,

Products used:


Now as I mentioned Suha has a fantastic 50% sale, it's still on for a few days so pop on over to her shop and maybe catch yourself a few bargains, or maybe Christmas presents for another crafter, 

Happy Crafting!!!

Friday, 7 September 2018

Christmas card with easy Poinsettia tutorial

Hi guys, I've made a Christmas Card this week!!!!!!! EEKK!!!
Those that know me know I don't really usually do Christmas till November and then usually under duress, lol so I am Ill? do I need my temperature read??
No really I just wanted to try Emilia's gorgeous flower die Leaves 002 as a Poinsettia styled flower, I have used this die a few different ways for a range of flowers, you can of course use it for a calyx behind other flowers too,
anyway here is how I used it this time and it looks fabulous but it's really easy to do,
I will give the tutorial for the flower below,


I started off with some paper in a blue colour then using a Tim Holtz stencil I used some paste through for a design on the base of my card, I let this air dry,


I've had this gorgeous snowflake in my stash for ages, to the side I glued some natural fibres and used these as my first layer then added a pair of skies over the bottom of the snowflake and too the side of the natural fibres, 


Next I glued my made up Poinsettia flower on the side then added some silver berries I bought from The Range, along with some pine cones and some die cut leaves, I also found in my stash a couple of gem stones,
Then I added a little white Gesso here and there to finish the card off,

Easy Foamiran Poinsettia tutorial:


 Die cut two of the largest and next sized down Leaves 002 dies for each finished Poinsettia flower, in your chosen Foamiran I used 0.6 White,


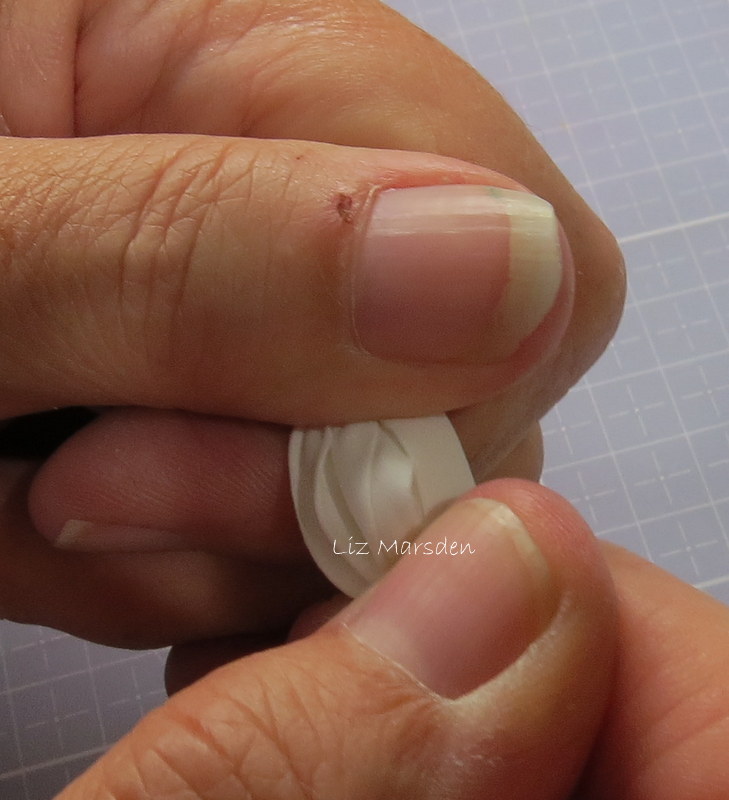
Take one of the flower heads and fold the petals together as best as you can, the scrunch the ends of the petals only backwards and forwards between your fingers till they look similar to above, do this for each flower die,


Carefully ease the flower heads open, slightly shaping the middle part of each petal by easing them outward between your thumbs, (do this slowly and carefully so as not to tear the Foamiran)  trying to keep the ends scrunched as shown,


Layer the two largest flower heads together off setting the petals, then glue the smaller two the same way on top of the larger two,


Make a hole in the centre of the flower and thread some stamens of your choice through, 


Glue the stamens in place behind the flower head to set, you can use hot glue or as I have this time Beacon 2- in 1 glue,

Remove the wire and leave to dry if using the glue I used,


When dry cut off the excess stamens and use your flower how you wish,


I kept mine very simple, you can of course colour the petals or use a coloured Foamiran, or add glitter if you wish, maybe that's for next time!!! Lol
Well I hope you can see how easy it is to make one of these flowers,

Lady E Leaves die 002
Foamiran 0.6 white
Happy Crafting!!