https://lizscreativecorner.blogspot.com/http://lizscreativecorner.blogspot.com.au/p/my-canvases-and-altered-art.htmlhttp://lizscreativecorner.blogspot.com.au/p/my-tutorials.htmlhttp://lizscreativecorner.blogspot.com.au/p/challenges_24.html

Pages

My Lovely Friends,

Tuesday, 15 November 2016

Violin with foamiran flowers

Hi guys, I just got some of the fabulous foamiran from Noor Design UK to make my first foamiran flowers with and gosh I love it, I had this daft urge to also make a violin, don't ask me why!!! so I got a image of the internet and after tracing round the image and cutting it out I then decided to make it into a 3D Violin,
I used a Die cut from Tracy at Noor design UK too use as the string holder, this was an oval shape so I cut it down and used two of the ends sticking them together to make it stronger,
Excuse the tired strings, I hadn't any stronger twine and this just bended and kinked, and wouldn't stay were it was supposed to, so hopefully it looks like it a well loved musical instrument, lol
I used the gorgeous papers by Maja Design from the Vintage Romance collection, I also used some  gorgeous lace from my stash,
I  played about with bits of paper, then hand cut all the other bits needed for the strings,
I made the flowers with the white foamiran, from Tracy at Noor design UK, cut them out with  some flower die cuts then coloured and shaped them, the stamens I had in my stash too,
I wanted some small leaves so I cut some free hand ( a great way to use up bits left over too) and scored them in the middle with a pricking  tool after I had coloured them,
Another view of the flowers,
I will certainly be wanting more of this foamiran as I love using it, if you have any questions, feel free to ask,
I then finished off my Violin with some pearls from my stash,
Happy Crafting!!
Hugs Liz xx

Thursday, 10 November 2016

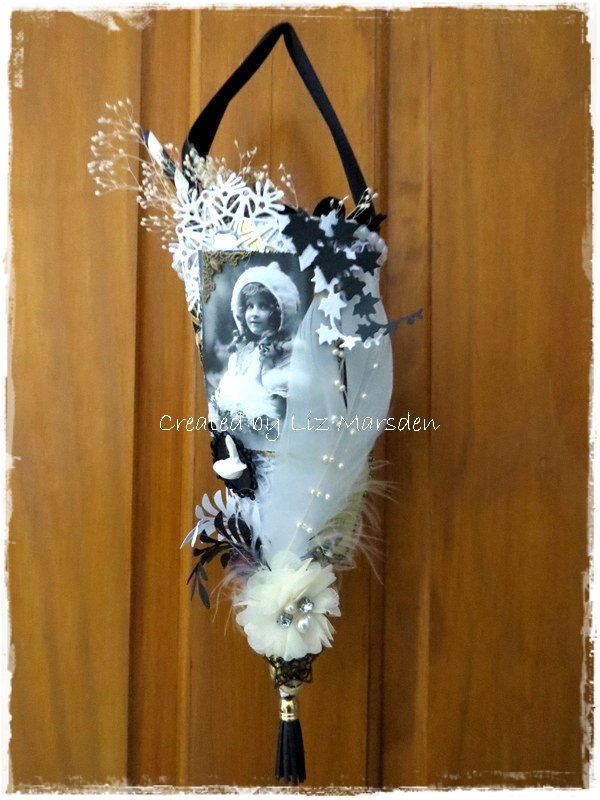
My first Tussie Mussie

As you know I have bought a few of the Crafteezze collections so today I'm showing another creation I made with the Art Deco Collection, 
I've made my first Tussie Mussie, using some of the kit and a few items from my stash too,
I found this gorgeous vintage photo in my stash, not sure where I got it from to be honest but just had to use it on here, I added one of the gorgeous corners from the kit on the top of the photo after I had distressed the edges a little,
Me and vintage EEEKKKK!!!  but It's growing on me, lol

Behind the photo I used a die cut snowflake from Tracy's Noor Design Uk  online shop, adding one of the clear gems in the middle, at the other side of this I added a couple of the leaf die cuts, to keep in with the colour scheme,
Below the photo Is the black and gold lace which I first wrapped around the Tussie Mussie then below that added a lattice border die, I added the black metal frame from the kit, adding a bird I made out of air dry clay and a mold from my stash,
The gorgeous feather in white this time again was part of the Art Deco kit, the pearl embellishment was in my stash,
Here you can better see the lace and the paper, 
Behind the feather on the other side I used one of the foiled sentiments from the kit along with a pen nib which isn't showing up here doh!!,
The top edge of the Tussie Mussie has another Lattice die cut border die attached and I added a pearl string over/on the top of the Tussie Mussie which I bought from Tracy's shop too,
If you squint you can just make out the pen nib just above the organza flower which again was in my stash, I then added a couple of more die cut leaves again keeping to the same colour ways, under the flower I used a star charm then on the very bottom of the Tussie Mussie one of the Tassels this time in black to hang down again part of the kit, to finish it off,
For the inside top, I lined it with some tissue paper then added some moss, tiny flower and another leaf die, from my stash, I then finished it off with two of the straws, a metal leaf in bronze colour and one of the large Prima black flowers which were all part of the kit, The ribbon holding it up was what Tracy had used to tie the package and it was perfect to use for this too,
So there you have my first Tussie Mussie, with a little vintage and a little Art deco, but I honestly can say I loved making this and will be doing some more,

Challenges
Noor Design UK - Winter
Deep Ocean - Use die cuts or punches

Happy Crafting!!

Tuesday, 8 November 2016

Christmas stockings

I'm back today with my DT post for
I've made a couple of Christmas stockings,
The first is a slightly vintage style,
I used some of the beautiful 46mm white Guipure lace on the top and some of the gold coloured sequins,

I used a template off my Cameo machine just making it larger, then I used one of the papers from the North Pole paper collection, for the base, The vintage style image is from the North Pole paper collection, I distressed the edges a little,
I built up layers with some of the fabulous Scrapiniec mesh background and some of the Christmas tree ribbon, I also used a  Wycinanka chipboard - Winter is coming garland - 01 which I have cut down,
I got this gorgeous Craft Passion - Holly with fruits die in my DT package the other day and it went fab with the image too, these dies cut beautifully first time, I slightly rounded the fruits/berries die cuts with my ball tool to give a little 3D effect,
I then used the same die behind a poinsettia die I have, this I cut out, layered it up then added a gold coloured sequin for the middle, I also used some of the decorative twig in red and some red Pomegrante apples too,
My second stocking is more shabby chic in style,
I used the same template, but don't they look so different? the papers used on this one are from the North Pole paper collection, I used some of the gorgeous shabby ruffle trim in white on the top this time, a silver coloured sequin and then some 25mm Guipure lace in white underneath,
Further down the stocking I also used some cotton lace,
I coloured this magnolia image with my distress re-inkers to match in with the colours adding a little purple too, I then used some purple Pomegrante Apples to bring the colour in too,
Behind my poinsettia I've used the same holly die cut from Craft passion and a Scrapiniec holly leaf which came as part of the  Big Holly Wreath chipboard by Scrapiniec, I also used a white Pomegrante apple this time as the center,
Close up of image and the gorgeous chipboard Poinsettia by Scrapiniec which I have covered with glamour dust and glitters like mad in real life,
So there you have two stockings, made similar but which look so different,
See you soon,
Happy Crafting!! 

Thursday, 3 November 2016

Silent Night

Hi guys, I thought I'd show you today a card I have made using some of the products from the Yuletide kit from Tracy (Crafteezee) at Noor Design UK again and the
 Dutch Doobadoo star shape template, I have had this a few years, but this year I really have used it a lot,
I couldn't resist using this gorgeous scene on one of the Pion papers in the kit, using it as the main feature, I just added a few light hints of Snowtex ( love this stuff) which was also in the kit here and there to give a snow like effect,
I then added the large Scrapiniec frame again from the kit just adding some glamour dust over the top, I do love sparkle, especially at Christmas!!
I again made a Poinsettia with a die from my stash this time adding Liquid applique on the edges of the petals and some stamens from my stash which luckily went with the colour scheme, underneath this I added a cane charm from the kit, see picture below,
I added a few Pomegranate apples in red again to keep in with the hints of red in the paper, some natural coloured flowers again from my stash that I think Tracy now sells in her shop too, I finished it off with a little cheesecloth and some tiny beads from my stash too,
 I used some of the white ribbon, and bells that were part of the kit to finish off the top, along with a bit of twine again from my stash, finishing off with a little Snowtex added on the bells, 
I then added a little liquid Applique on some of the paper edges here and there too,
I have loved this collection, there are so many gorgeous products to play with, I have really loved creating with them, talking of which I had a small piece of the main focal paper I used left, so I made a tag with it, ( well it was a shame to waste it)!!!! lol
This time I added some glamour dust glitter on the edges of the trees, rooftops and in the sky, then another cane from the kit and some Pomegranate apples from my stash then on the top some of the seam binding left over from my last kit, I used one of the snowflake buttons again part of the yuletide kit, I still have a few things left from the kit too, so they are really good value, do check them out,

Challenges
Live and love crafts - White Christmas
Noor Design UK - Winter
Deep Ocean - Punches die cuts

Happy Crafting!!

Tuesday, 1 November 2016

Snowflake Charm

Hi guys, it's Tuesday so I'm here with my inspiration for 
This time I've used a wee digi - Garden Gnome coloured with my copics, but I have stuck some die cut snowflakes over the top of the butterflies drawn by the talented Sylvia Zet, to make it winter themed instead, hope that's ok Sylvia,
I used the gorgeous papers from the White Christmas collection by Crafts and You Design, distressing the edges again as usual,
I love this Scrapiniec Snowflake chipboard from the Tekno collection, adding a little glamour dust over the top as I love the glittery effect especially at Christmas,
At the bottom of the image I added some of the lovely lace and decorated twigsglass strawberrystamens and pomegranate apples,

Copics used:
Skin - E000, 00, 11, 21, - R20
Outfit - E17, 27, 46, 59
Hair - E41, 42, 43, 44
Flowers - YR31, Y26, 28

Happy Crafting!!